Learn All the Notes on the Fretboard in This Easy-to-Follow Lesson
Elevate your playing with this simple guide to fretboard memorization
Learning all the notes on the fretboard is one of the simplest steps you can take to elevate your playing.
Before you curse us out for recommending such an arduous task, consider the following: a doctor must know the body’s anatomy, an accountant must know basic arithmetic and a webmaster must know the code that makes up a webpage.
Knowing the fundamentals of the instrument will make it easier to tackle the more difficult aspects of playing that you’ll encounter down the road. You’re probably familiar with the adage that you must learn to crawl before you can walk. That saying can be applied here as well.
Besides, learning the neck’s notes won't be very difficult if you follow the simple steps in this lesson. As you’ll see, some of the information in here is about things you already know – we’re just including it to help put all the knowledge into perspective.
So put on your thinking caps and let’s get cracking.
The Chromatic Scale
The chromatic scale is a series of 12 tones that ascend or descend in half-step increments, or one fret at a time. In other words, this scale names every note on the neck, one by one, in succession.
Before you put it into playing terms, it’s a good idea to memorize the scale itself without playing the notes on the guitar. There are two simple rules to follow when memorizing the chromatic scale.
First, the notes follow a sequence that starts on C and ends on B (C D E F G A B).
Second, between these notes you’ll find sharps (#) or flats (b). A sharp raises a tone by one fret, and a flat lowers a note by one fret.
There are two exceptions to this rule: the note pairs B-C and E-F are just a half step apart, so there is no sharp or flat between them.
By using these two rules you should arrive at this scale spelling: C-C# | Db-D-D# | Eb-E-F-F# | Gb-G-G# | Ab-A-A# | Bb-B. The only thing that may change is your starting pitch, as the chromatic scale can start on any note.
FIGURE 1 is a complete grid of the notes on the fretboard, ending at the 12th fret. Notice how the notes at the 12th fret are the same pitch as the open strings on which you started? That’s what is known as an octave – the same pitch, only one register higher. At this point, the scale recycles itself up the rest of the neck (for example, the 13th fret has the same note names as the first). When committing the note names to memory, be sure to use the markers on your fretboard as landmarks, assigning specific note names to particular areas of the neck.
FIGURE 1

Horizontal Scale Patterns
Now that you’re familiar with the chromatic scale, let’s focus on applying this newfound knowledge of the neck to different keys.
FIGURE 2 is a list of the notes in each key, both major and minor. The only thing that differs between the two scales on each line is the starting point. For example. C major starts on C (C D E F G A B) and A minor starts on A (A B C D E F G).
FIGURE 2
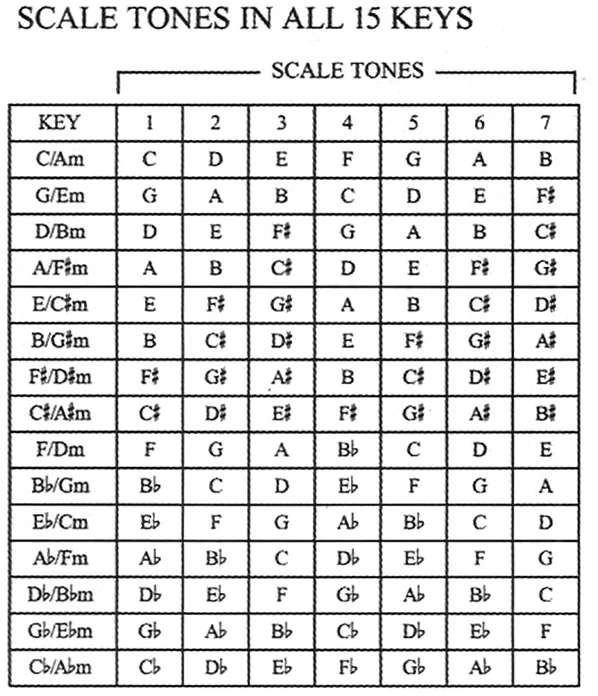
Now that you know the note names in each scale, try to find them on the neck one string at a time. FIGURE 3 is a two-bar phrase, this time centered in the key of E major (row 5 of FIGURE 2). Here the open high E string functions as pedal tone in between the other scale tones. Angus Young of AC/DC often used this clever technique in his solos, and you should feel free to apply it as well when devising your own licks, as long as the open string you’re using as a pedal tone is in the same key as your solo.
FIGURE 3

FIGURE 4 is a mirror image of the previous figure, but this time it’s written in E minor, the relative minor in the key of G (row 2 of FIGURE 2). Try to find the notes in each key listed, string by string, until you get acquainted with their locations on the fretboard. You may want to record yourself strumming the root chord of a given key and then play along using the corresponding scale. This is fun way to not only learn the scale but also get your creativity flowing.
FIGURE 4

Vertical Scale Patterns
By now you should have a pretty clear visualization of the neck in a string-by-string horizontal fashion. So let’s move on to vertical scale patterns.
FIGURE 5 is a G major (row 2 of FIGURE 2) scale pattern in 3rd position. In this case you’re learning the scale across all six strings rather than focusing on one string at a time. (To include the high E string, play the notes A-B-C on frets 5-7-8, respectively.)
FIGURE 5

One of the most beneficial aspects of pattern-based scales on the guitar is that they are movable. For instance, if you take the pattern played in FIGURE 5 and shift it up two frets, you have an A major scale. Try to move this pattern to different areas on the neck, improvising over all the respective keys listed in FIGURE 2.
If you’d like to play over one of the minor keys, say E (the relative minor of G), FIGURE 6 offers a popular scale pattern.
FIGURE 6

Remember: You can move this pattern to any minor key simply by shifting the entire pattern in a different position on the neck. There are endless possibilities when combining the horizontal and vertical patterns, so explore as many avenues as possible.
Learn Your Octaves
One way to facilitate fretboard memorization is to find all the places on the neck where you can play a specific pitch.
FIGURE 7 is a group of frames that show various places on the neck where you can find the note G and its octaves.
FIGURE 7

FIGURE 8 uses the vertical G major scale pattern you learned in FIGURE 5, this time adding the octave of each scale tone in the pattern.
FIGURE 8

Often, you’ll see both notes of an octave played simultaneously (a staple technique for rock and jazz guitars). FIGURE 9, culled from the E minor scale, is a good illustration of this technique. Use a pick, or strum with the side of your thumb, and be sure to mute the string located between the fretted notes with the fleshy part of your 1st finger. Learning all the places on the neck to play a specific note will help you find the origin of the key in which you’re playing.
FIGURE 9

Bonus Round
By now you should have a pretty good idea of what it takes to learn all the notes on all the strings. Remember, learning the fretboard is a continuous process, and you should drill yourself with these exercises until you feel confident in your neck knowledge. This will make you not only a better guitarist but also a better musician.
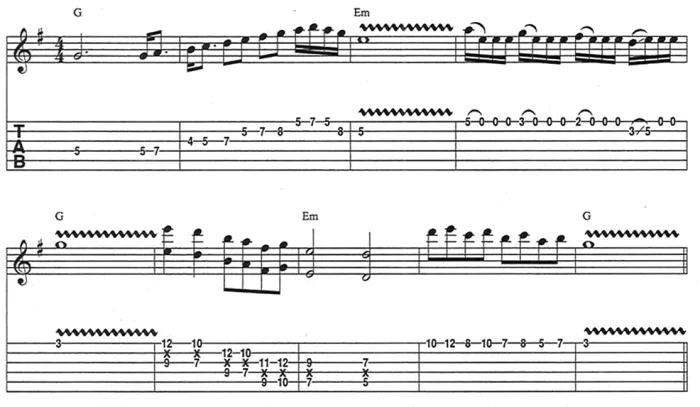
FIGURE 10 is an eight-measure solo rooted in G major. It will give you an idea of what you can accomplish when applying all of the content discussed in this lesson. Give it a shot, and then try to concoct one of your own
FIGURE 10
Get The Pick Newsletter
All the latest guitar news, interviews, lessons, reviews, deals and more, direct to your inbox!
Guitar Player is the world’s most comprehensive, trusted and insightful guitar publication for passionate guitarists and active musicians of all ages. Guitar Player magazine is published 13 times a year in print and digital formats. The magazine was established in 1967 and is the world's oldest guitar magazine. When "Guitar Player Staff" is credited as the author, it's usually because more than one author on the team has created the story.
“Write for five minutes a day. I mean, who can’t manage that?” Mike Stern's top five guitar tips include one simple fix to help you develop your personal guitar style
"It’s like you’re making a statement. And you never know where it’ll lead." Pete Thorn shares the tip that convinced Joe Satriani he was the right guitarist for the SatchVai Band

