Unlock the Secrets of Expressive Melodic Playing
Hone your note articulation skills and cultivate your own signature touch with this lesson in legato and staccato phrasing, finger sliding, string muting, bending, and vibrato.

Like a painter's brush stroke or an author’s turn of phrase, every great guitarist has a signature touch, which is a confluence of many factors, from musical influences and equipment choices to all aspects of technique. But at the most granular level of anyone’s playing you’ll find one crucial element: their unique approaches to note articulation.
Articulation is the musical term for the way you attack an individual note or chord, as well as the way you connect one note to another. Examples of guitar articulations include picking with a downstroke or upstroke (each of which sounds a little different), fingerpicking, thumbpicking, palm muting, staccato phrasing (cutting a note’s durations short), and legato techniques, such as hammering-on, pulling-off, and tapping.
Combined with other expressive elements involving the fret hand, such as sliding from note to note, bending, and/or shaking a string (vibrato), the possibilities for giving notes and phrases an expressive, vocal-like quality are wide ranging and nearly limitless. So how do you know which articulations to use and when?
Developing a good instinct for this artform can take years of diligent practice to attain, and it can be perplexing to know where to start, but it is foundational to anyone’s playing. This lesson will help you hone your note articulation skills and cultivate your own signature touch and lead-playing style.
Dynamics
Tragically, the importance of dynamics, or volume contrasts, is often ignored, when in reality it is arguably as important as the other four elements of music – melody, rhythm, harmony, and timbre (tone). Dynamics refers to variances in your volume or the intensity of your playing throughout a piece of music.
With respect to pick-hand articulations, it involves accenting certain notes, which means picking or plucking them more forcefully than normal, giving them greater emphasis so that they stand out. Using accents gives a melody a sense of liveliness. To demonstrate this, let’s first look at a string of repeating, alternate-picked C notes in Ex. 1a.
Without any accents or variation in pitch or articulation, we have a monotonous, droning stream of notes. Add accents on every downbeat, by picking the first 16th note harder than normal, as in Ex. 1b, and suddenly it begins to sound like music. But the fun really begins when you start varying the placement of accents so that they fall on some of the upbeats too, as illustrated in Ex. 1c.
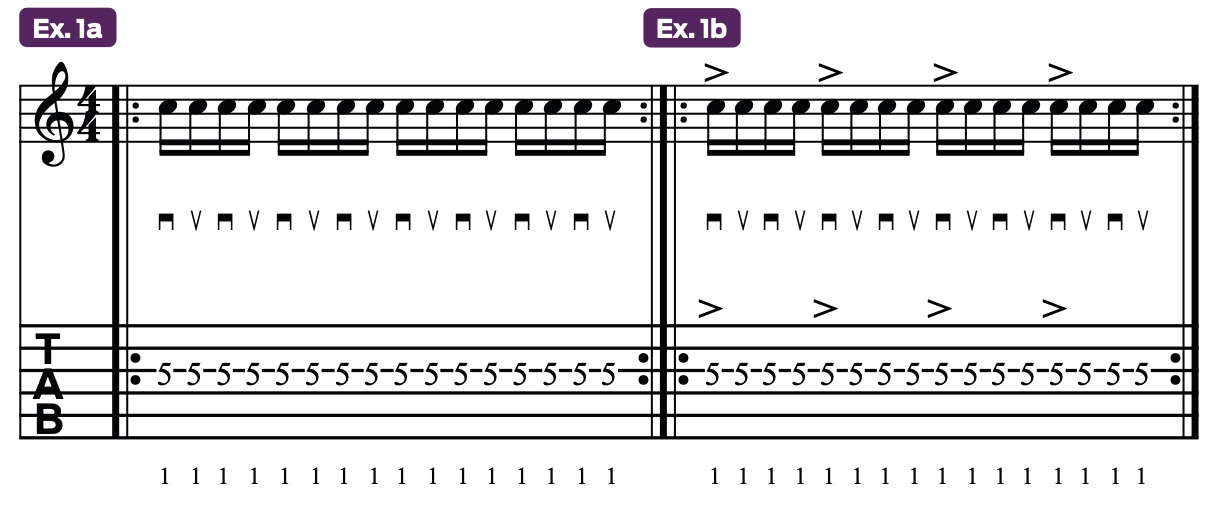
By shifting some of the accents to the second, third, or fourth 16th note of the beat, we develop a sense of syncopation in the music, creating depth and building momentum where there wasn’t any before. And this is only with one repeating note, comparable to the way a drummer will use dynamic accents within a steady stream of 16th notes on the snare.
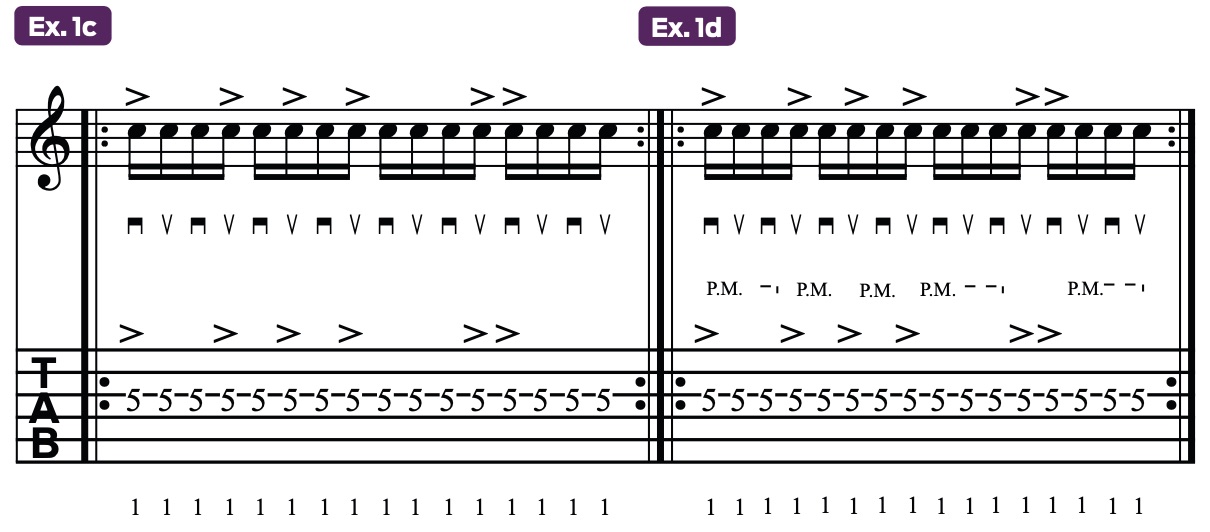
Building on the previous example, Ex. 1d adds palm muting (P.M.), which involves laying the edge of your pick-hand palm on the strings just in front of the bridge as you pick.
Doing this dampens, or mutes, the string vibrations, producing a more subdued and “chunky”-sounding attack and a quicker note decay, or shorter duration (less sustain). As this example demonstrates, doing this on most of the unaccented notes exaggerates the contrasts between them and the unmuted, accented notes, further enhancing the phrase’s dynamic range and musical appeal.
Other Basic Articulations
It’s easy to think of your picking hand as comparable to a sledgehammer or a scalpel: Either you’re indiscriminately bashing away at chords or delicately chipping away at single notes. In reality, your pick hand is more like a Swiss Army knife: a multifaceted mechanism that can be wielded with elegance, violence, or any conceivable blending of the two touches.
Every aspect of your picking, even the way you hold your pick, affects the articulation of every note you play, so this is something to carefully consider. Let’s start by establishing a base exercise.
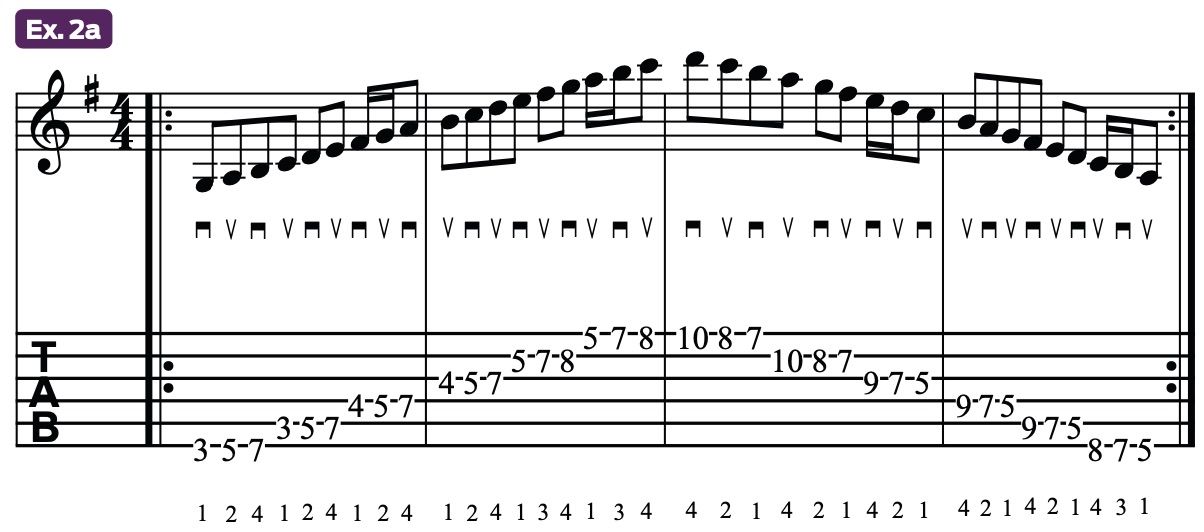
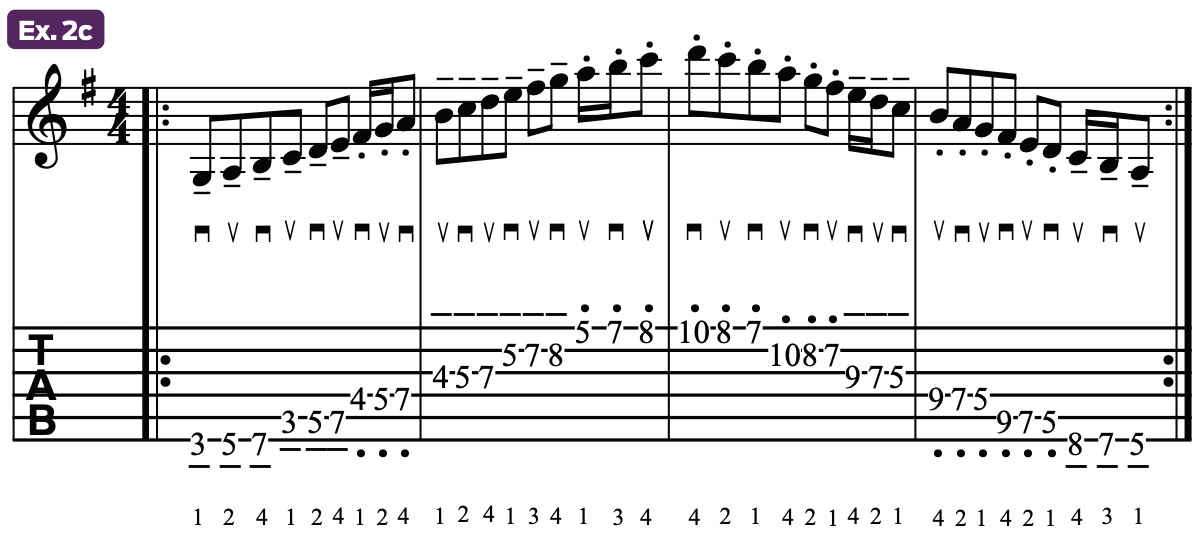
Ex. 2a is a two-octave G major scale (G, A, B, C, D, E, F#) played across all six strings, using three notes per string and alternate picking. Throughout the next couple of examples we will be modifying this exercise to demonstrate different ways in which you can wield your pick to more nuanced effect.
In Ex. 2b, you will see a small dot above each note. These are staccato markings. Staccato is the musical term for “short in duration,” specifically 50 percent of the note’s normal value. The staccato dot tells you to silence the note shortly after striking it, with a brief “hole of silence” before playing the next note, as if there were a rest falling between the notes.
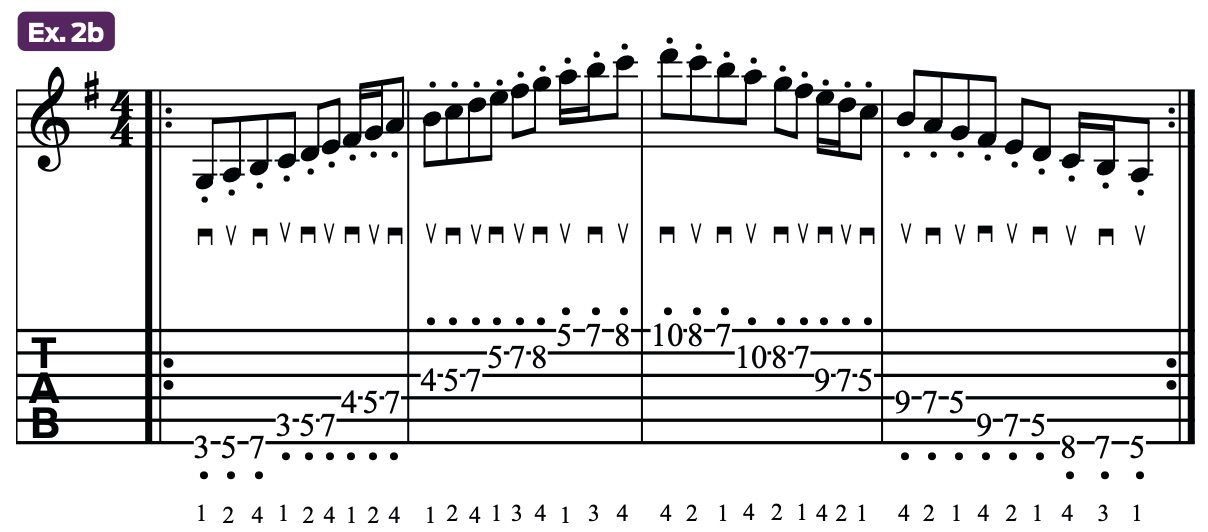
You can effectively cut off each note by momentarily loosening your fretting finger’s grip on the string after picking, but without letting go of the string. The movement is small and barely visible. As you play the staccato version of this G major scale, you’ll hear that it sounds much more “pointed” and “choppy” than before.
Ex. 2c mixes and matches these approaches, with courtesy tenuto markings (the dashes over certain notes) that remind you to hold those notes for their normal, full duration. It can be tricky to switch back and forth between tenuto and staccato articulations, so practice this exercise slowly at first and, as always, with a metronome.
Legato Techniques
Legato is the musical term for connecting melody notes together seamlessly. For guitarists, this means playing two or more consecutive notes on a given string after picking only the first note.
In music notation, legato phrasing is indicated by a slur, which is a curved line that arcs from one note to the next. The slur indicates that only the first note – where the arc begins – is picked.
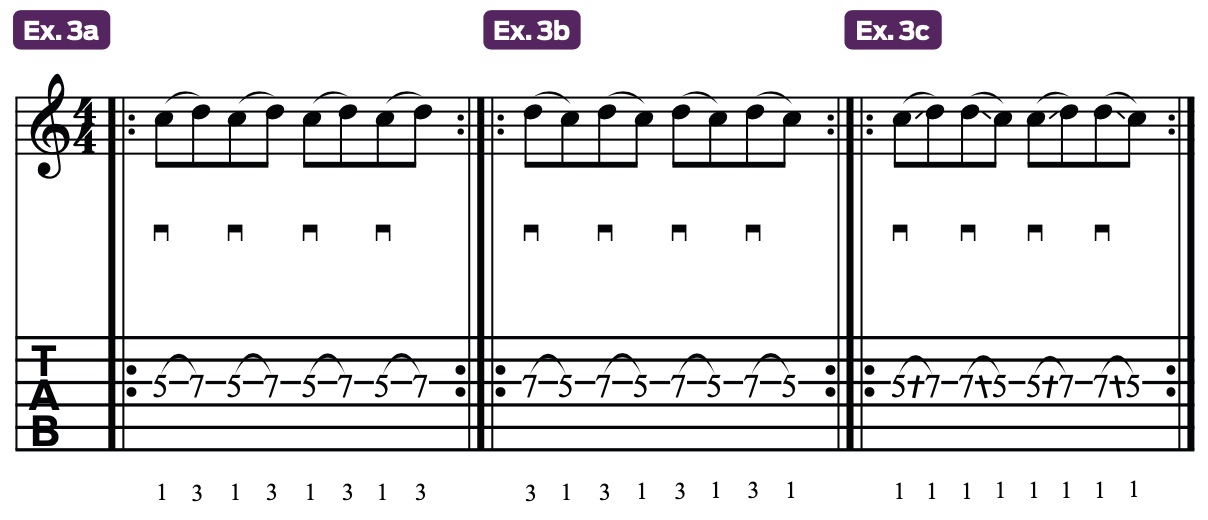
There are three ways to achieve a legato articulation on the guitar: 1) Hammering-on: moving from an open or fretted note to a higher note on the same string by firmly tapping, or hammering, a fretting finger down onto the string and holding it there until it’s time to play the next note, as shown in Ex. 3a with the notes C and D.
2) Pulling-off: moving to a lower note on the same string by removing the higher note’s fretting finger to reveal the lower note, as illustrated in Ex. 3b. If the lower note is fretted – that is, not an open string – it should be pre-fretted before initiating the pull-off, so as to “catch” the pull-off while the string is still vibrating.
To keep the string vibrating and ensure that the lower note rings with sufficient volume, the finger that’s performing the pull off should slightly yank the string sideways, in toward the palm, as it leaves the string, as opposed to simply lifting the finger straight up.
3) Sliding: moving a single finger up or down a string from one fretted note to another, by shifting the finger while keeping it pressed against the string, as demonstrated in Ex. 3c.
When sliding, maintain just enough finger pressure against the string to keep it ringing. But you needn’t press any harder than that, as doing so will only serve to create undue friction against the fretboard, making the sliding movement needlessly arduous to perform.
What about fretboard tapping? That technique, while performed with the pick hand, is essentially a different method of hammering-on and pulling-off, in terms of the resultant legato articulation and sound. So in terms of execution, the same guidelines apply.
The three previous examples have you connecting only two notes, C and D. But you can also chain together a variety of legato articulations to clearly sound multiple notes on the same string without having to pick it more than once.
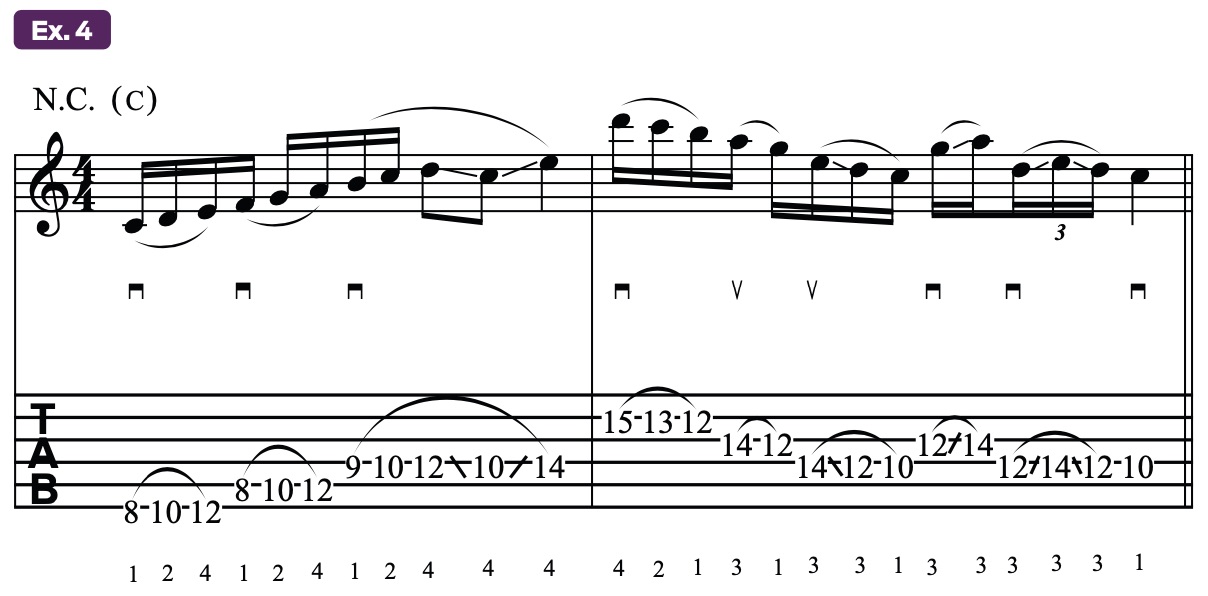
Ex. 4 is based on the C major scale (C, D, E, F, G, A, B) and incorporates the use of double hammer-ons, double pull-offs, and two-directional finger slides to create a smooth, fluid-sounding melody.
String Bending
In many styles, the coolest and most expressive way to articulate a note on the guitar is to bend up to it from below, either as a quick grace note or in rhythm, or time – what’s called a rhythmic bend.
The technique and art of string bending – and making it sound polished – takes a great deal of control and practice to master, requiring highly trained fret-hand muscles that are “programmed” and continually guided by the ear.
A bend may be performed by any finger – although the pinkie (4) is the weakest and hardest to control and is not advisable to use much – and by either pushing the string upward (away from the palm) or pulling it downward (in toward the palm).
When bending the high E string, your only option is to push it in toward the middle strings, as pulling it downward would cause it to fall off the fretboard. Likewise, when bending the low E string, you can only pull it downward, for the same reason.
With the other four strings, you have the option of either pushing or pulling, and each technique feels different. When push-bending, you’ll want to hook your thumb around the top side of the fretboard (by the low E string) to give your hand an anchor point with which to keep the neck in place as you push the string and neck upward with your bending finger(s).
For any bend greater than a half step, which is equal to one fret above the note you’re bending from, it’s beneficial to employ reinforced fingering, using two or more fingers to push or pull the string, for added strength and pitch control.
The ring finger (3) generally works best as the note-fretting finger, with the middle finger (2) serving as the reinforcing finger, placed one fret lower on the same string. For bends greater than a whole step, you’ll find it advantageous to additionally enlist the aid of the index finger (1), placed one fret below the middle finger.
So it’s “3(+2),” or “3(+2 and 1).” And while pushing or pulling a string up or down will raise its pitch, the push-bending technique is the most widely used, as lead licks are most often played on the higher strings.
Using progressively wider intervals, Ex. 5 is an exercise designed to sharpen your ear and technique for precision string bending, with each successive bend becoming more challenging to perform. In each bar, you begin by picking the open high E string, which will serve as your reference “target pitch” for each ensuing push-bend on the G string.
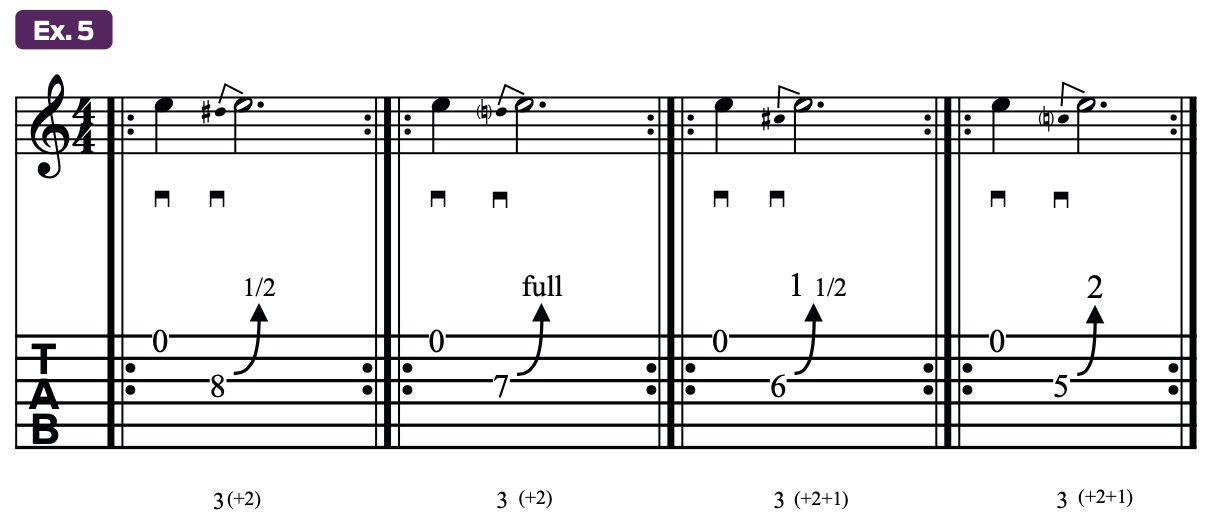
You’ll start with a half-step bend from D# to E at the 8th fret, then subsequently move the bend down chromatically (one fret at a time), increasing the distance, or width, of the bend in half-step increments until you reach the 5th-fret C note, which is bent up a whopping two whole steps, or a major 3rd (C to E).
This last bend is tough to perform, so don’t feel discouraged if you can’t bend the note all the way up to E at first. With practice, you’ll get better at it. Pitch accuracy is the name of the game here, so make sure every bend matches the pitch of the open high E note dead-on, and without overshooting it.
Ex. 6 demonstrates a few of the many things you can do with a single-note push-bend, starting from G on the B string’s 8th fret. You will repeatedly bend the note up a whole step, to A, but each bend will take on a different shape, or “slope,” and character.
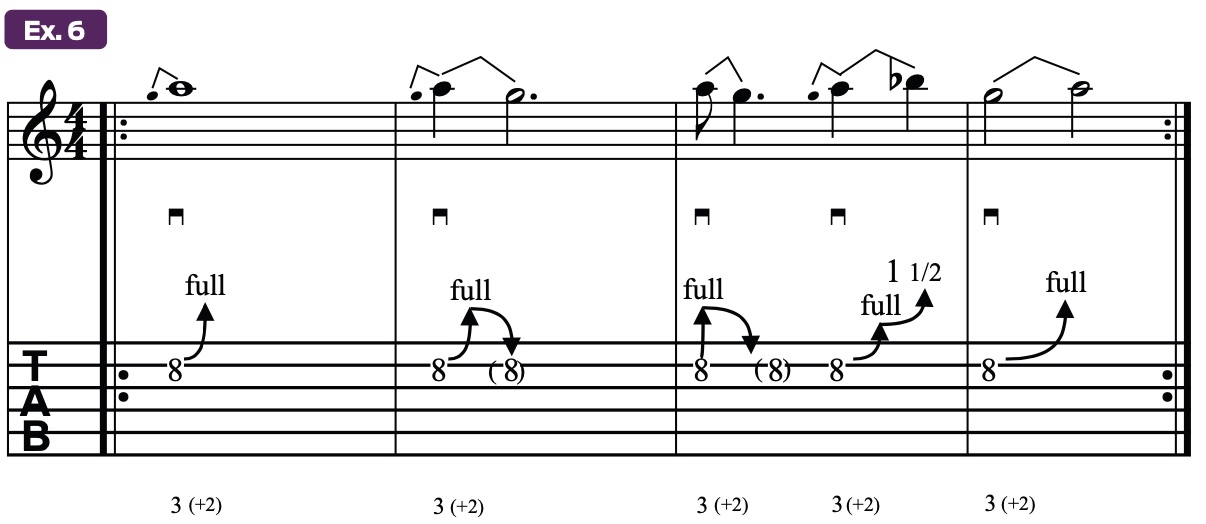
Depicted in this exercise are the standard held bend, where you bend the string and hold the note, as in the previous exercise; the bend-and-release, whereby you bend the note, then release it back to its original pitch; the pre-bend (also known as a “ghost bend”), for which you silently bend the string, pick it, then release the bend (this is known as a pre-bend and release, or a reverse bend); the multi-step bend, which consists of a bend added on top of another bend; and, finally, the delayed bend, for which you gradually bend the string after picking it, so that you hit the target pitch a number of beats later, in this case, two.
Now let’s put these ideas to work in a melodic exercise.
Ex. 7 is based on the E minor pentatonic scale (E, G, A, B, D) starting in 12th position. Here you’ll use all the types of bends demonstrated in the previous exercise across all six strings, while adding a new, previously undiscussed type of bend – the quarter-step bend.
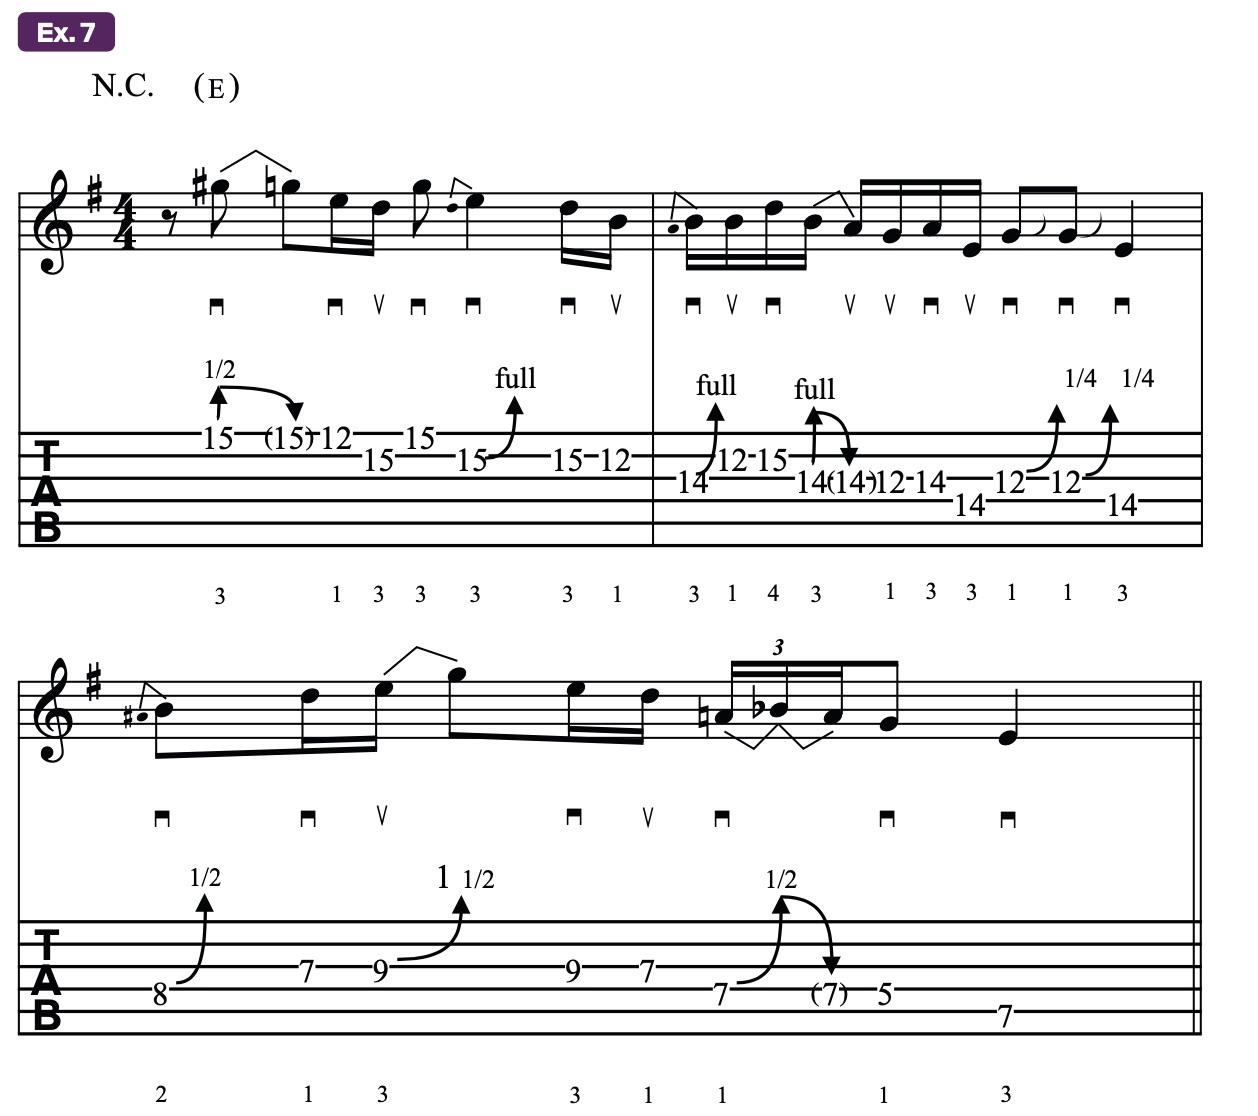
Also known as a “curl,” this is a slight, subtle bend that rises only about midway to the next higher note and provides just a hint of color and soulful expressiveness to a melody. In this case, you’ll want to pull the G string downward at the 12th fret, in toward your palm, using only your first finger.
Vibrato
One of the most distinguishing elements of a guitarist’s sound, or “voice,” is their vibrato. Recall B.B. King’s fluttering index-finger trills, David Gilmour’s subtle tremolo-bar warbles, and Yngwie Malmsteen’s wide, violin-like note shakes at the end of a blistering run.
Every great guitarist’s vibrato is unique and distinctive, and the key is to find a technical approach that’s comfortable for your hands and sounds vocal-like and pleasing to your ears. There are various ways to achieve a musically appealing vibrato effect on the guitar, such as by playing with a slide or using a whammy bar, but here we’ll limit our discussion to the technique of finger vibrato.
Keep in mind that, due to the presence of frets, each of which stops a string at a fixed point, a finger vibrato is best achieved not by wiggling the finger back and forth, or sideways, as you would see a violinist, cellist, or slide player do, but rather by performing a series of quick, evenly spaced “micro bends” – less than a quarter step – and releases as a note is held.
A quarter tone, or quarter step, is more than enough of a pitch fluctuation to produce a pronounced vibrato effect, although some players, for more swagger, like to go with a wider vibrato, bending the pitch as far as a half step, or beyond that, for a bold, over-the-top vibrato effect.
First and foremost, as you administer a finger vibrato, make sure you manage to convey the intended “base pitch,” with the vibrato repeatedly modulating it up or down but always returning to it.
Next, the vibrato movement should come from the wrist, not the fingers. Simply hold the note with your finger and either twist, pull, push, or rock your wrist back and forth, depending on the string(s) you’re playing on and your personal preference. This method is ideal because the wrist is much stronger than any individual finger and can pivot with ease while the finger holds the note in place and “goes along for the ride” with the wrist movement.
Also, it’s good to practice using vibrato with each individual finger, as your approach and technique may vary from finger to finger.
Ex. 8 has us shifting from one finger to the next as we ascend the G string in half steps, starting from C at the 5th fret. Note that vibrato is indicated by a squiggly horizontal line.
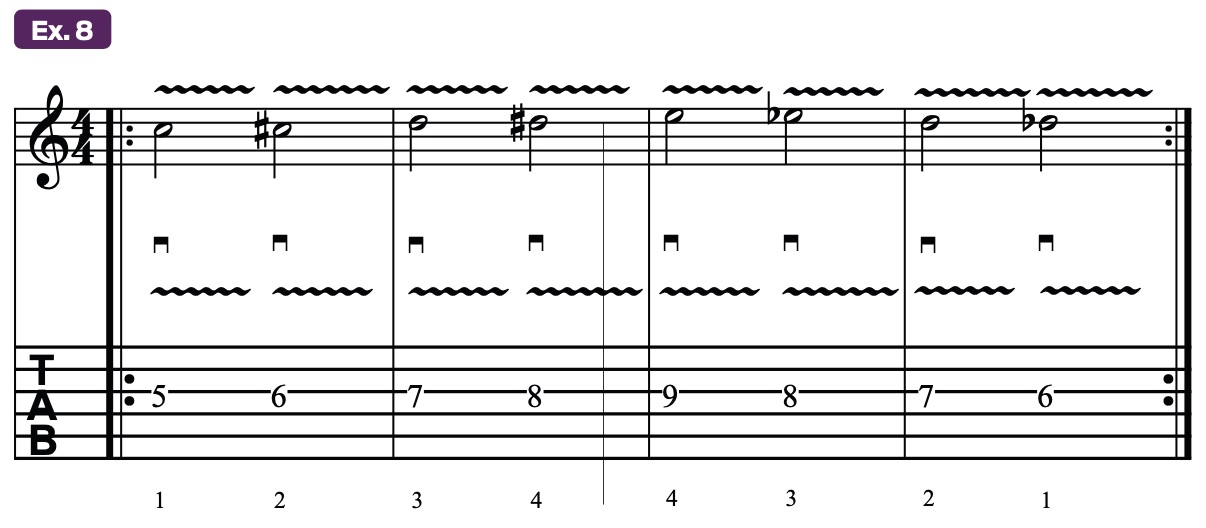
An important factor to consider is that the character, or “feel,” of a vibrato is determined by two variables: the speed and width of the pitch fluctuations, or modulations.
Depending on the song’s tempo, the speed, or rate, of the vibrato can be thought of as being any rhythmic pattern, ranging from eighth-note triplets to 16th notes, 16th-note triplets, or 32nd notes. The important thing is that the rhythmic pulsation remains consistent.
The width of a vibrato refers to the amplitude of the pitch modulation, or how far you’re raising or dipping the note up or down. When you first tackle Ex. 8, strive to maintain a consistent vibrato speed and width with each finger.
Once you feel comfortable and confident doing that, you can try altering the sound of the vibrato effect as you move through the exercise, gaining or reducing speed, starting out narrow and then widening it, or vice versa.
You may choose to use a one-size-fits-all approach to vibrato, which can work well, but you can truly set yourself apart by changing up the speed and width from note to note. Also, try performing this exercise on every string.
Let’s look at a melodic example that employs vibrato using different fingers across all six strings.
Ex. 9 is a jazzy melody in the key of A minor, to which you’ll apply vibrato, at the speed and width of your choosing, to any note that’s held for the duration of an eighth note or longer.
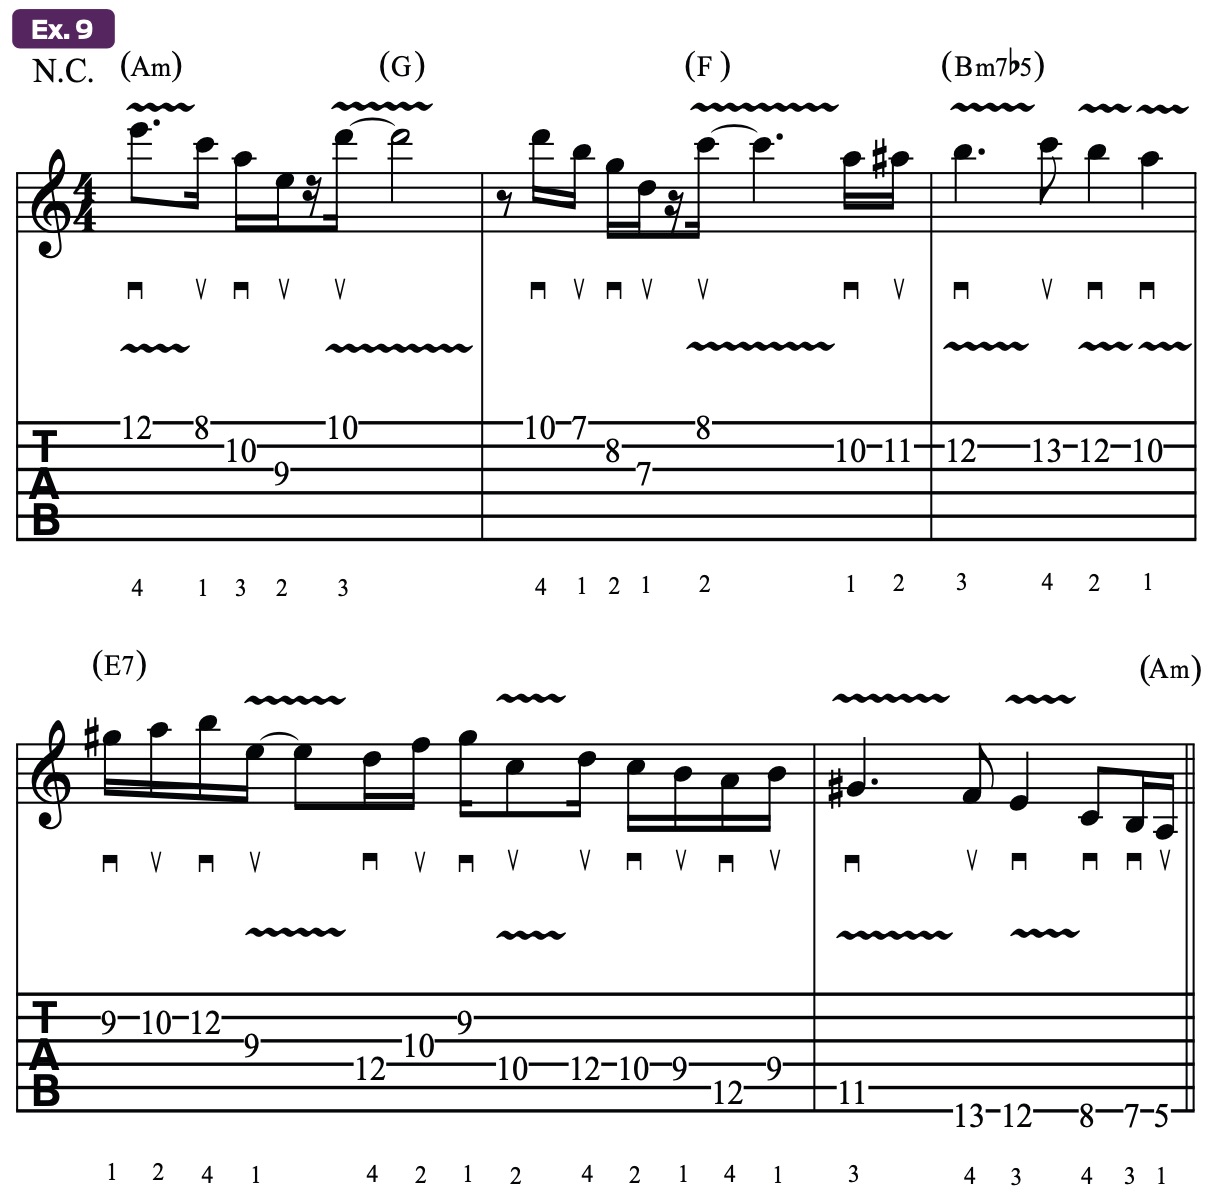
Take great care in applying each of the vibratos, using your ears to guide your fingers. Also, try playing the exercise without any vibrato, to get a clear sense of the basic melody. Doing this will help you decide what kind of vibrato “feel” works best for each sustained note.
See what happens when you adjust these elements on a single note as you’re holding it. Also, consider delaying the onset of vibrato with a long-held note, which can be a very expressive technique, one that you’ll hear great singers employ.
Tying It All Together
Let’s finish up with a “grand finale” musical exercise that employs every type of articulation we’ve explored, plus a new one – bend vibrato – for which you bend up to a note then apply vibrato to it by partially releasing the bend by about a quarter tone, then restoring it to the target pitch in a quick, even, repetitious manner.
So in this case you’re actually dipping below the target pitch to create the vibrato effect, which can sound the most vocal-like and pleasing of all vibratos.
Ex. 10 is a bluesy melody based around the D natural minor scale (D, E, F, G, A, Bb, C) that features this and all the other articulations we’ve covered. One thing you may notice in this exercise is that not every note is given a special articulation, nor are there too many examples of any one articulation.
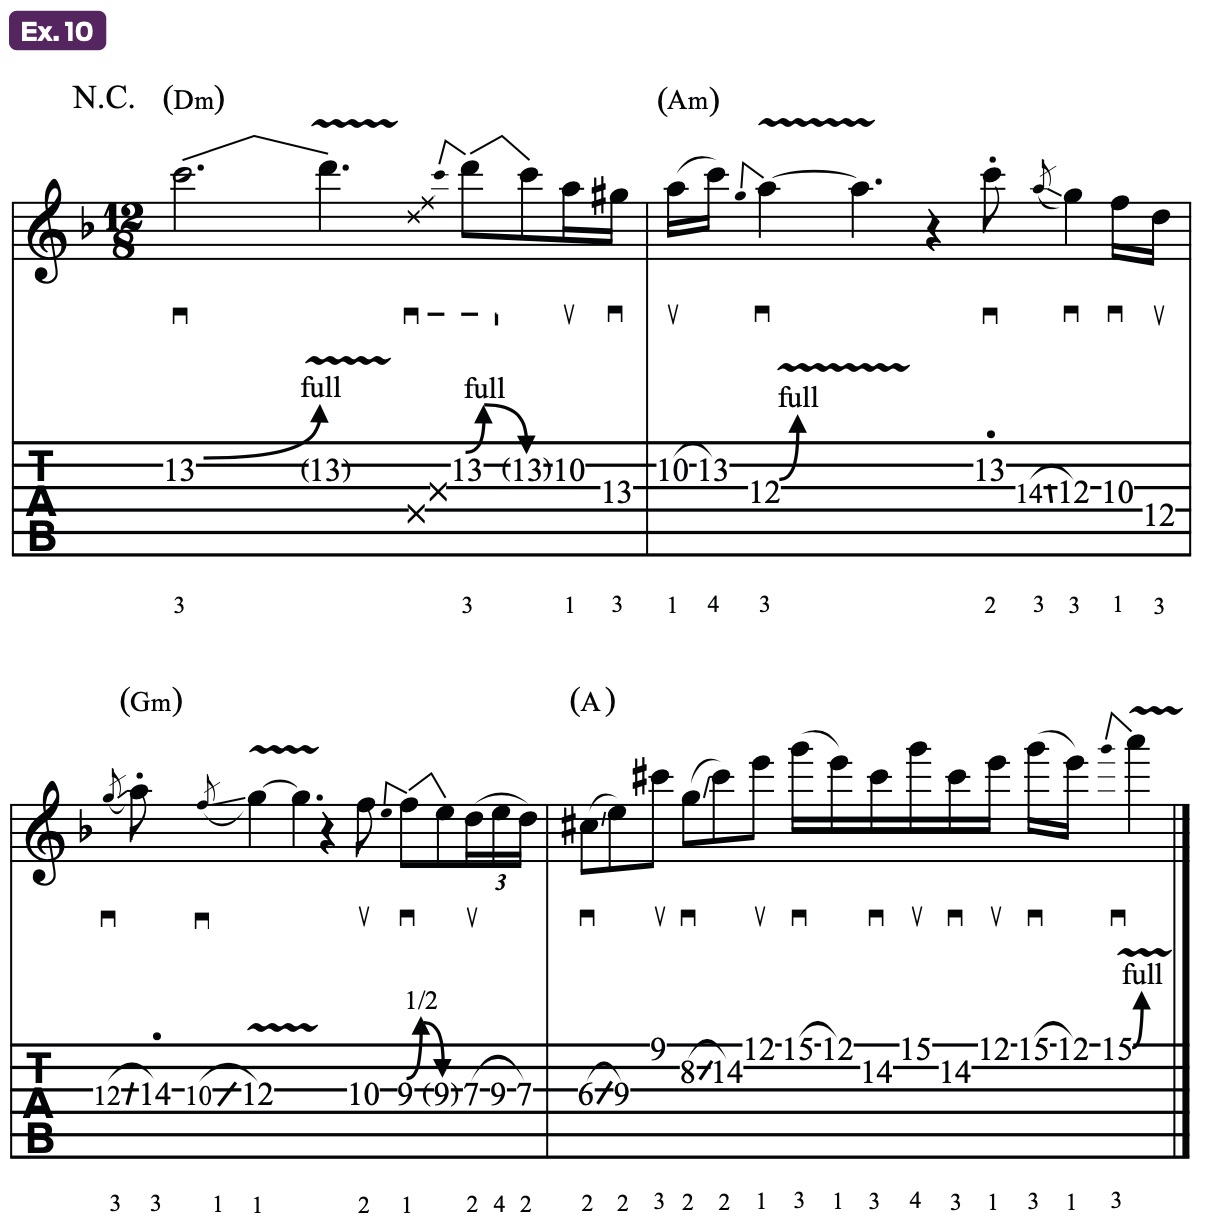
As with most things in art and life, there needs to be balance. It’s perfectly acceptable for some notes to be played plainly – just picked. The key is to tastefully decide how and where to apply special articulations.
Get The Pick Newsletter
All the latest guitar news, interviews, lessons, reviews, deals and more, direct to your inbox!
“Write for five minutes a day. I mean, who can’t manage that?” Mike Stern's top five guitar tips include one simple fix to help you develop your personal guitar style
"It’s like you’re making a statement. And you never know where it’ll lead." Pete Thorn shares the tip that convinced Joe Satriani he was the right guitarist for the SatchVai Band

