All the latest guitar news, interviews, lessons, reviews, deals and more, direct to your inbox!
You are now subscribed
Your newsletter sign-up was successful
Last month we covered triad and 7th-chord arpeggios, focusing on the top three strings. Here, in the conclusion of our two-part lesson, we’ll start with the lower three strings and combine those shapes with the ones we learned last month.
And whereas Part 1 focused mostly on triads, we’ll now explore 7th-chord arpeggios in greater depth.
As before, there will be lots of exercises and licks, plus we’ll top things off with a full-blown solo. Let’s get going!
Article continues belowRoot-Position Triads On The Bottom Three Strings
As you’ll recall, in Part 1 we started with an introduction to the three fundamental types, or qualities, of triads that exist within the major scale: major (1, 3, 5), minor (1, b3, 5), and diminished (1, b3, b5).
These root-position triads were mapped out along the fretboard on the top-three string set (the G, B, and high E strings), in the key of C. Now, let’s follow the same procedure on the bottom three strings.
Take a look at the neck diagram in Example 16. The three-dot groupings represent the shapes of the harmonized triads of the C major scale: C (C, E, G), Dm (D, F, A), Em (E, G, B), F (F, A, C), G (G, B, D), Am (A, C, E), and Bdim (B, D, F). Solid lines are used to connect the dots that form the shapes of the major triads (C, F, and G) while dashed lines conjoin the notes of the minor triads (Dm, Em, and Am).
Dotted lines are used to connect the notes of the oddball Bdim triad. All triads are voiced in root position – root, 3rd, 5th – with their roots on the low E string. As we discussed in Part 1, with the triads on the top-three string set, these low-string voicings are also playable as chords, but again, the main goal is to play them melodically, one note at a time.
All the latest guitar news, interviews, lessons, reviews, deals and more, direct to your inbox!
Example 17 presents a musical exercise that allows you to cruise through the triads, in ascending order, with the help of finger slides on the low E string. (The fret-hand fingering suggestions are exactly that – suggestions. Feel free to experiment with alternate fingerings and decide what works best for you.)
Example 18 follows the same triad order but with some breakups in the rhythms and variations in the melodic flow.
Notice that the various legato handoffs from triad to triad occur on all three strings. Spend some time acquainting yourself with these shapes, but don’t feel like you have to play all of them in one fell swoop. For example, isolate neighboring triads and practice shifting back and forth between them.
Two-Octave Triad Arpeggios
We’re now going to combine these triad voicings with the top-three-string-set triads introduced last month in Part 1 of this lesson. Take a look at Example 19. This color-coded system illustrates the result of combining root-position triads on the bottom three strings with their upper-octave counterparts on the top three strings.
Red dots and lines depict the major triads (C, F, and G), black dots and dashed lines show the minor triads (Dm, Em, and Am), and blue dots and dotted lines represent the Bdim triad.
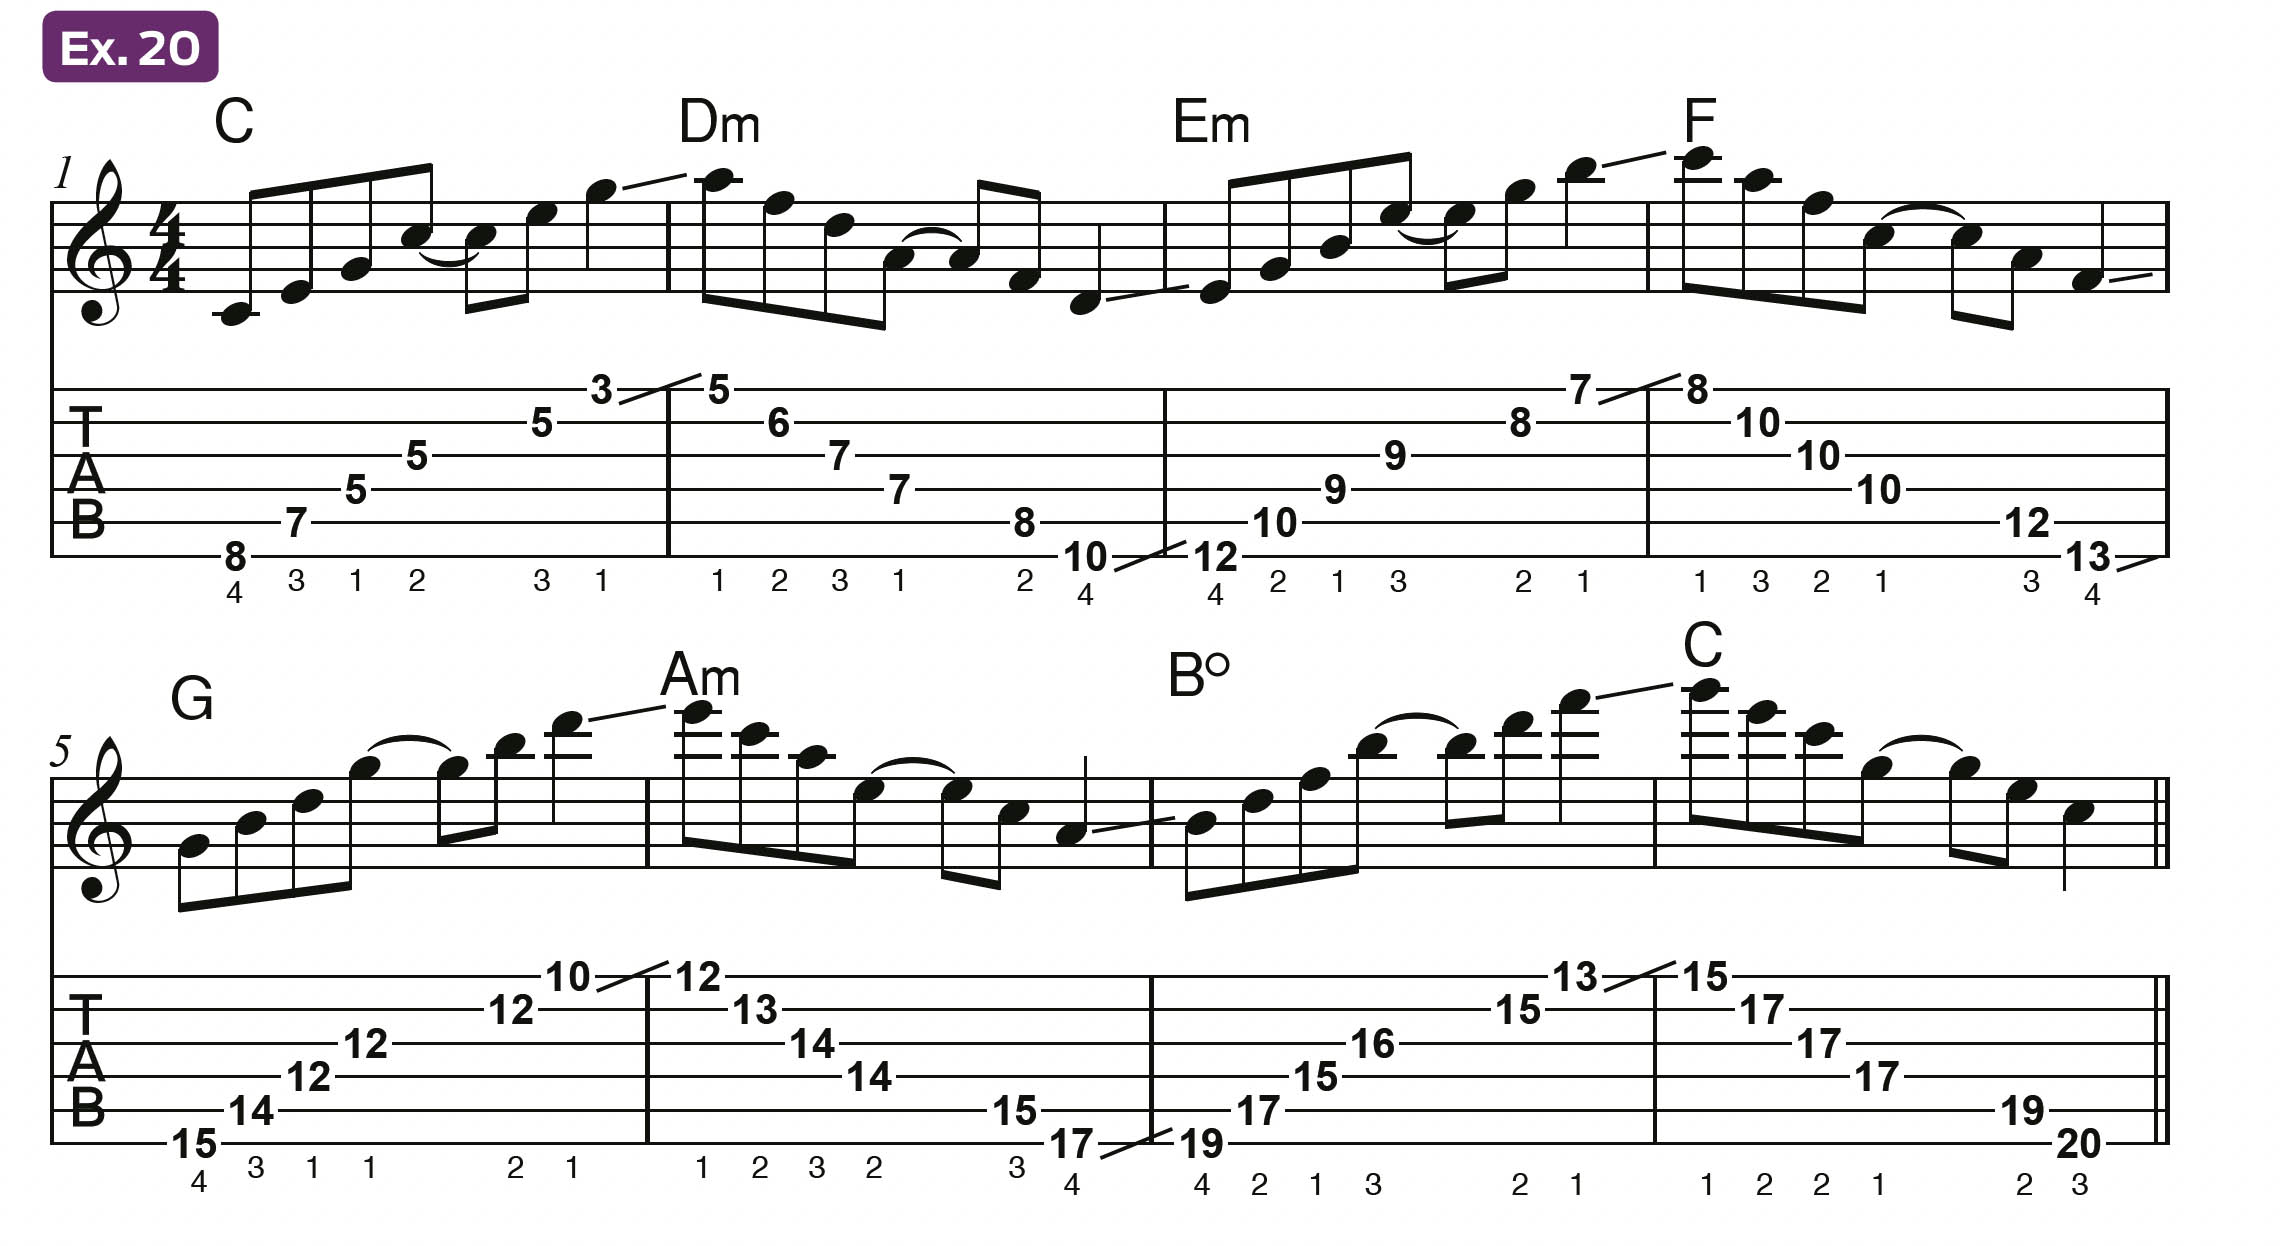
As you may surmise, the contour of these two-octave patterns presents fret-hand fingering challenges, but with careful calculations, they are playable. Example 20 offers fingering suggestions for navigating each arpeggio shape. The built-in rhythm respites on the “and of 2” and beat 4 of each bar are strategically placed at tricky junctures. Once again, feel free to experiment with alternate fingering options.
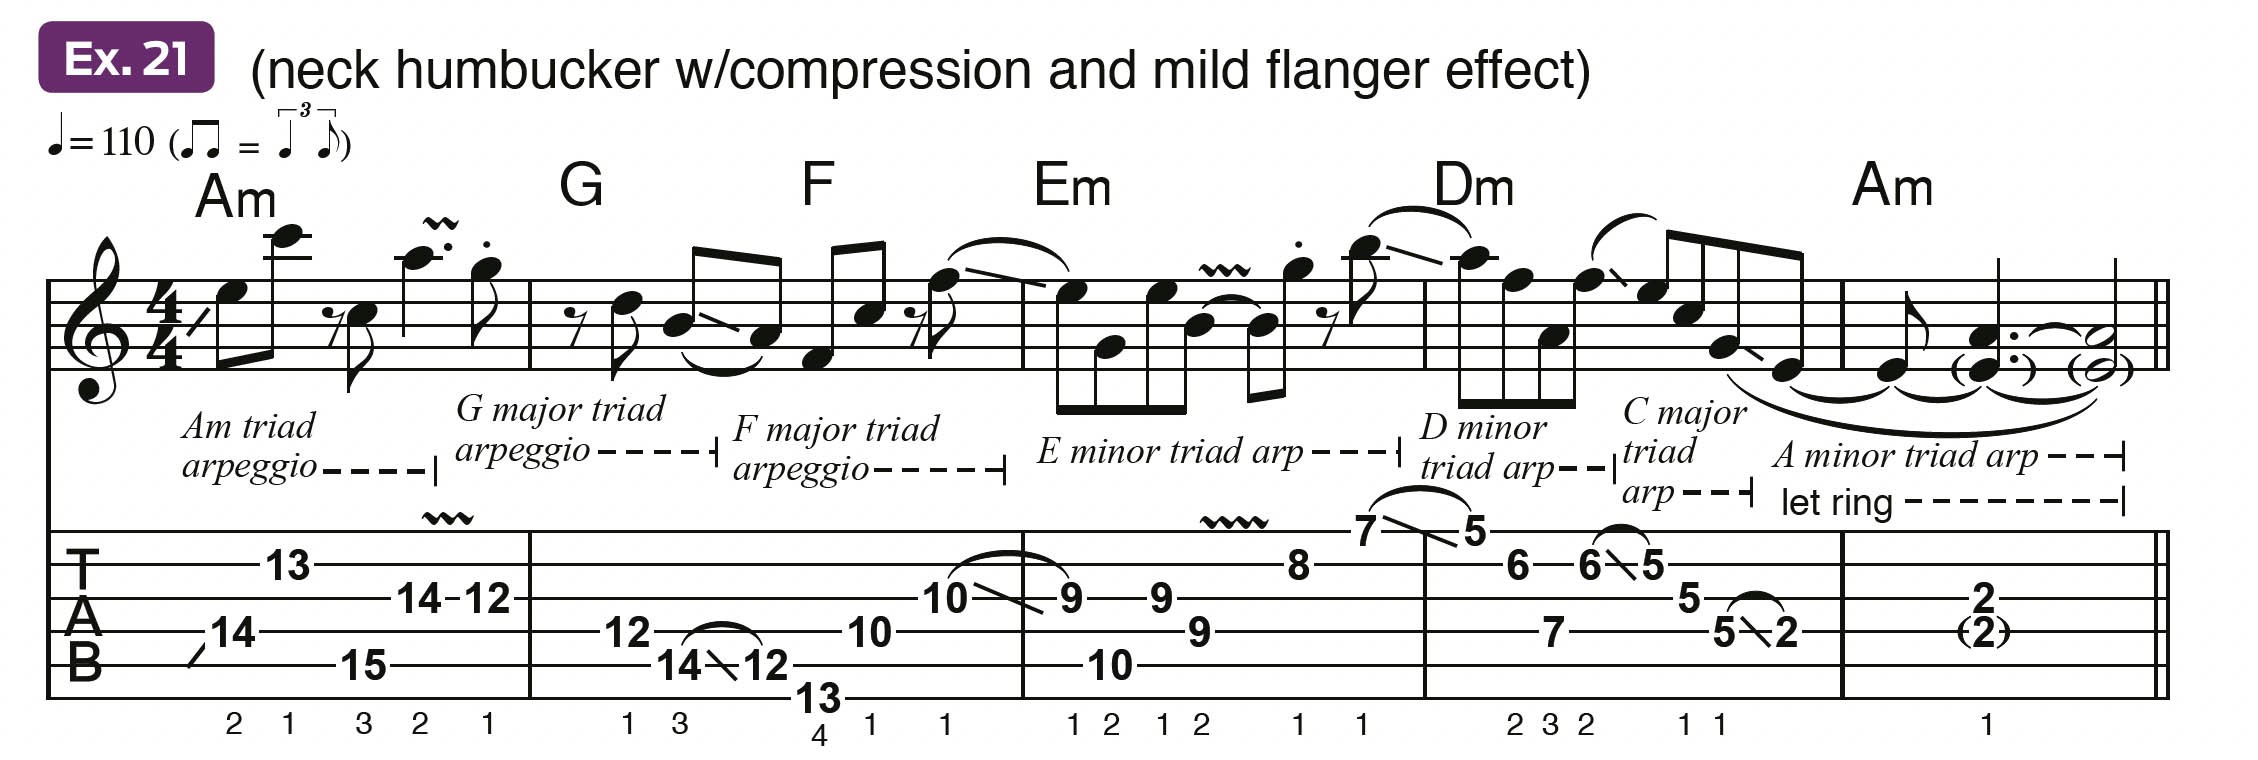
Example 21 is a light-rock shuffle passage that employs portions of the triad arpeggios outlined in Example 20. Notice the frequent string skips and wide-interval leaps, especially in bars 1 and 3, and how the melodic contour changes direction often, as opposed to the basic linear approach of simply running up and down the shapes. The smooth arpeggio segues in bars 2 and 4 are drawn from the tactics discussed in Examples 17 and 18.
Visualizing 7th-Chord Arpeggio Shapes
In Part 1, we constructed 7th-chord arpeggios on the top three strings by taking the root-position triad voicings and adding the appropriate 7th degree on the high E string (the major 7th for maj7, and the minor, or “flatted,” 7th for m7, dom7, and m7b5). If you remember those shapes, great! But if you need a review, refer to the diagram in.
Play the C major triad (C, E, G) rooted on the G string’s 5th fret. When you arrive at the 3rd fret on the high E, reach up with your pinkie to grab the B note at the 7th fret. Essentially, you “leaped” over the next note in the scale, A, to arrive at B. That’s the Cmaj7 shape.
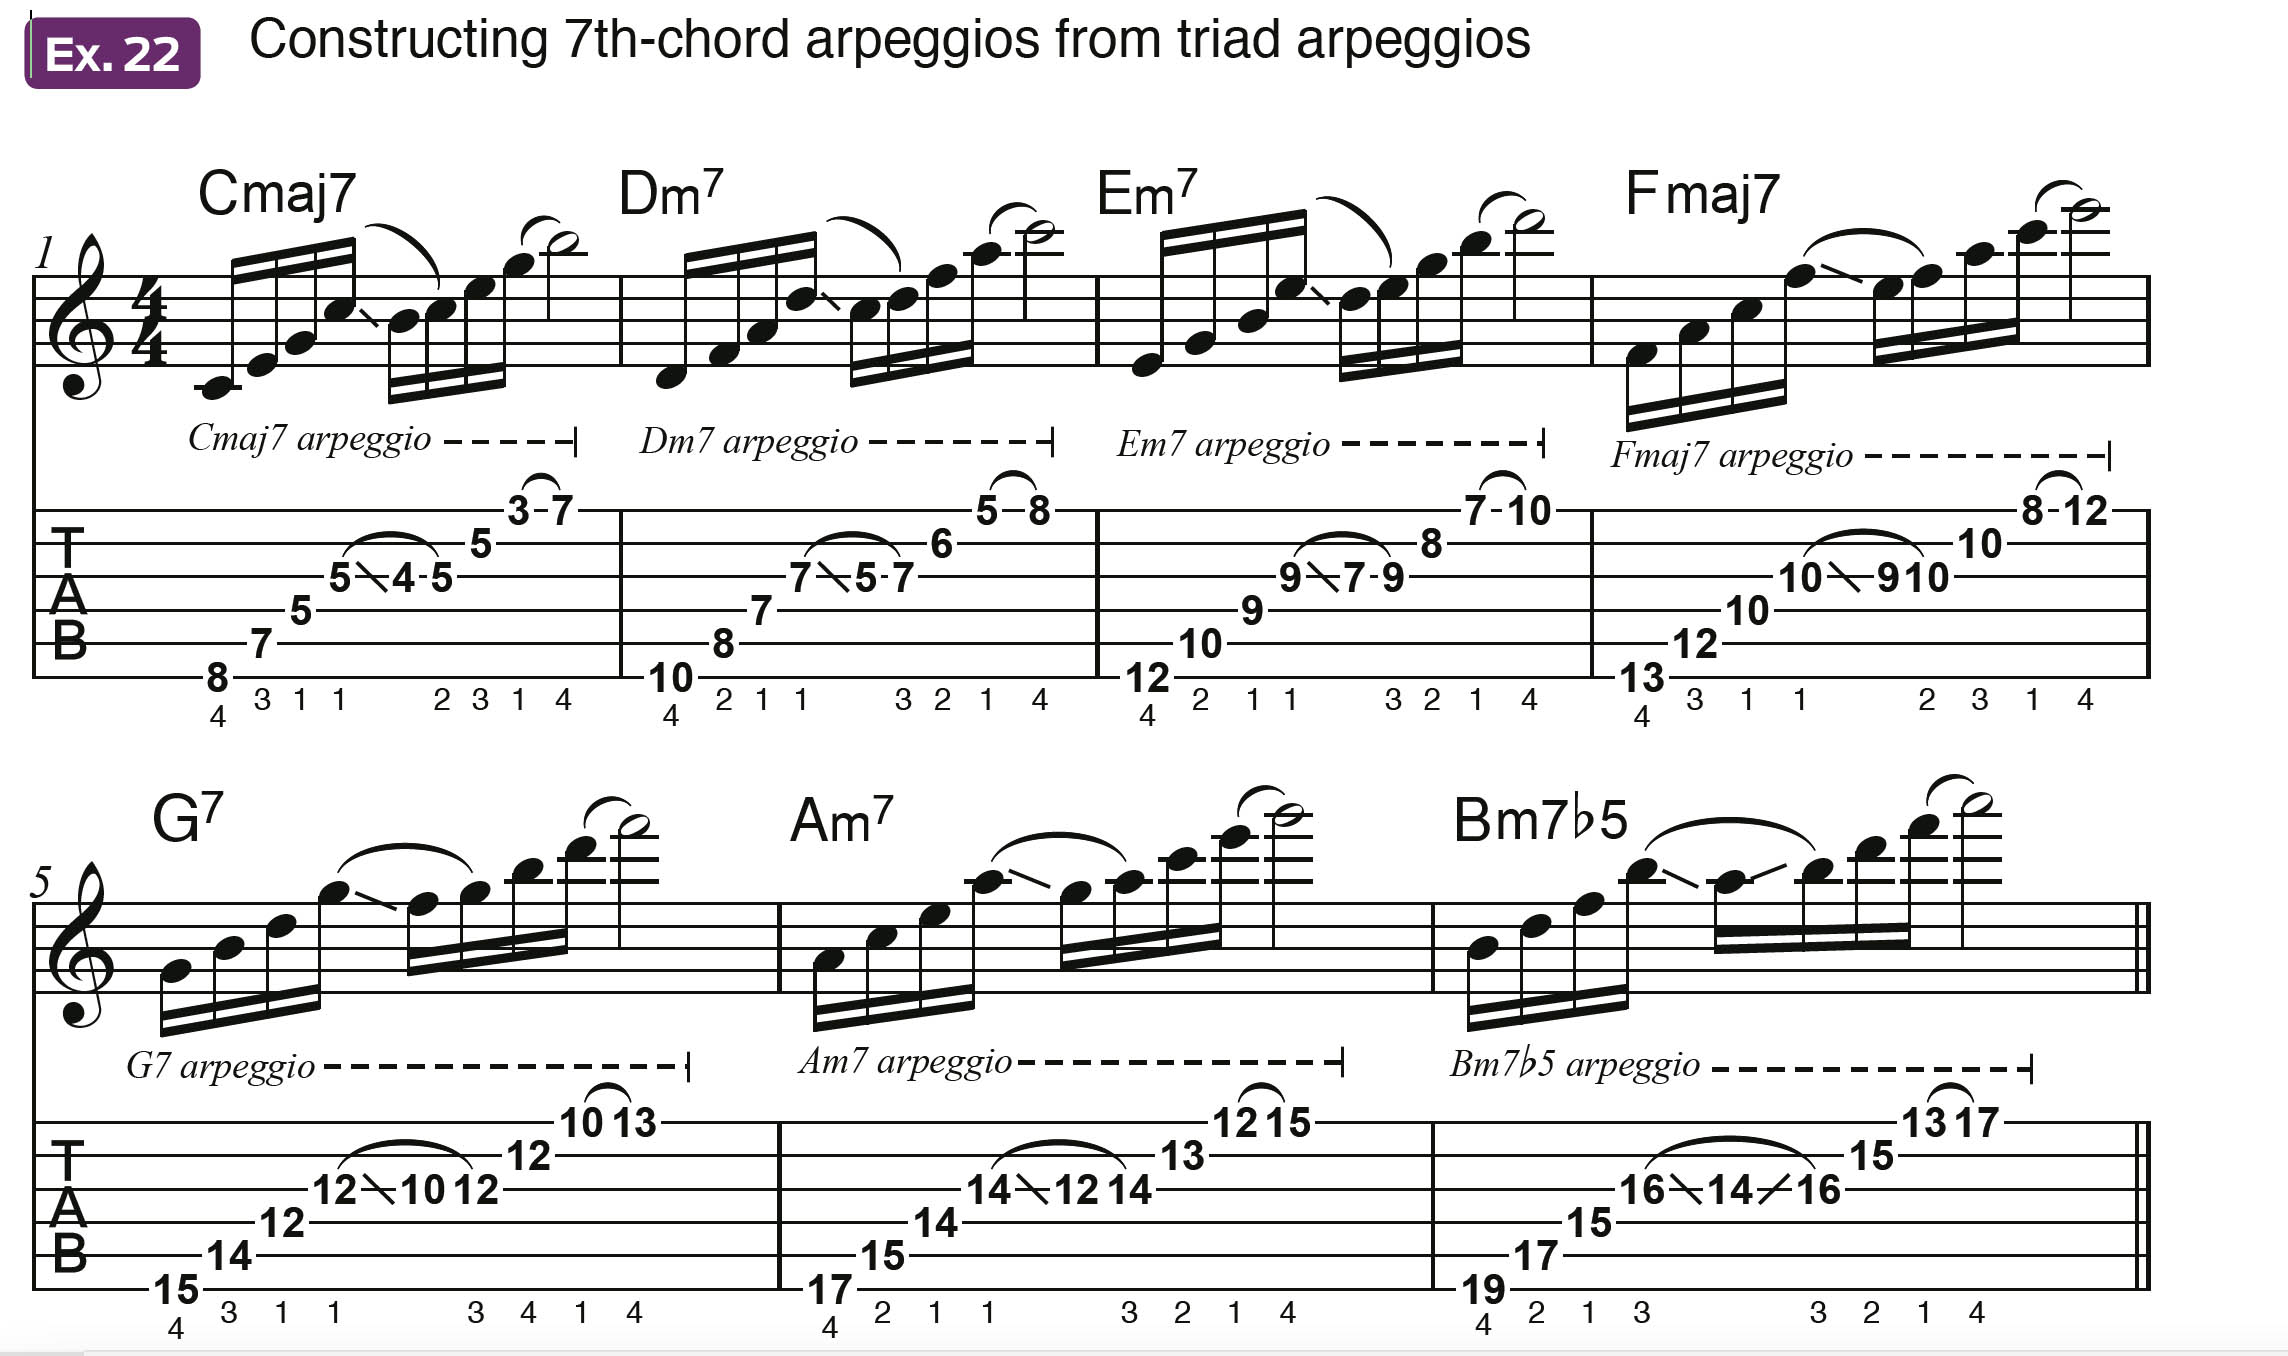
Follow in like kind up the fretboard, and you have all your one-octave 7th-chord arpeggios in the key of C. If your head is swimming, the next example should clear things up. Take a look at the extensive musical exercise in Example 22.
If you only play the last four notes in each bar, it will walk you through the top-three-string procedure described above. The first four notes in each bar form the low-string-set triads plus the octave, which is the root of the second-octave triad. The fifth note in each bar, which is the descending legato slide, is the crucial move. This is the 7th degree of each arpeggio, and once understood it’s quite easy to locate.
Thinking “backward,” the major 7th is a half step below the root (B in a Cmaj7 chord or arpeggio), and the b7th is a whole step below the root (D in an Em7 chord). If you use a legato slide to descend the G string to the 7th degree of each arpeggio, it puts your fret hand in the catbird seat to complete the upper-octave portion of the arpeggio.
Go through the exercise slowly, following the suggested fret-hand fingerings, and things should slip into place nicely.
Practical 7th-Chord Arpeggio Patterns
While the patterns in Example 19 work as an introduction to two-octave arpeggios and can certainly be used to create many fascinating licks and phrases, the reverse/horizontal contour can sometimes be cumbersome. Let’s take a look at some more conventional shapes.
The patterns in Example 23 illustrate the four fundamental 7th-chord arpeggios – maj7, (dom)7, m7, and m7b5 – with their tonic notes (roots) falling on the low E, G, and high E strings. (Many players call this the “G-shape” pattern because the root layout corresponds to that in an open G chord voicing. In this lesson these will be referred to as “Pattern 6S1,” as in 6th-string root, form 1.)
These shapes all begin life in much the same way as those in Ex. 19, but instead of traversing further down the neck, they continue vertically across the fretboard on the upper strings. Notice that the major 7th pattern includes an extra 7th degree in parentheses on the D string. This means it’s the player’s choice to fret the note there instead of playing it on the G string, five frets lower.
Take some time to get acquainted with these patterns, and try this procedure: Start on the lowest root (on the low E string) but immediately play the 7th below it. From there, ascend the entire pattern to the highest note and come back down to the lowest note (the 7th), and resolve to the original starting point (the lowest root).
The patterns in Example 24 are the “upper-neighbors” of those in Example 23. These shapes also have their root notes on the low E and high E strings, but the middle-octave roots are located on the D string instead of the G.
They are sometimes called the “E-chord-shape pattern,” because the tonic notes align with those in an open E chord, but in this lesson we’ll refer to them as “Pattern 6S2” (as in 6th-string root, form 2).
These shapes align well with common barre-chord voicings, as in 5th-position Am, A7, and A. The m7b5 arpeggio closely resembles a 6th-string-root blues scale pattern. Get acquainted with these patterns and then let’s move on to some lick examples.
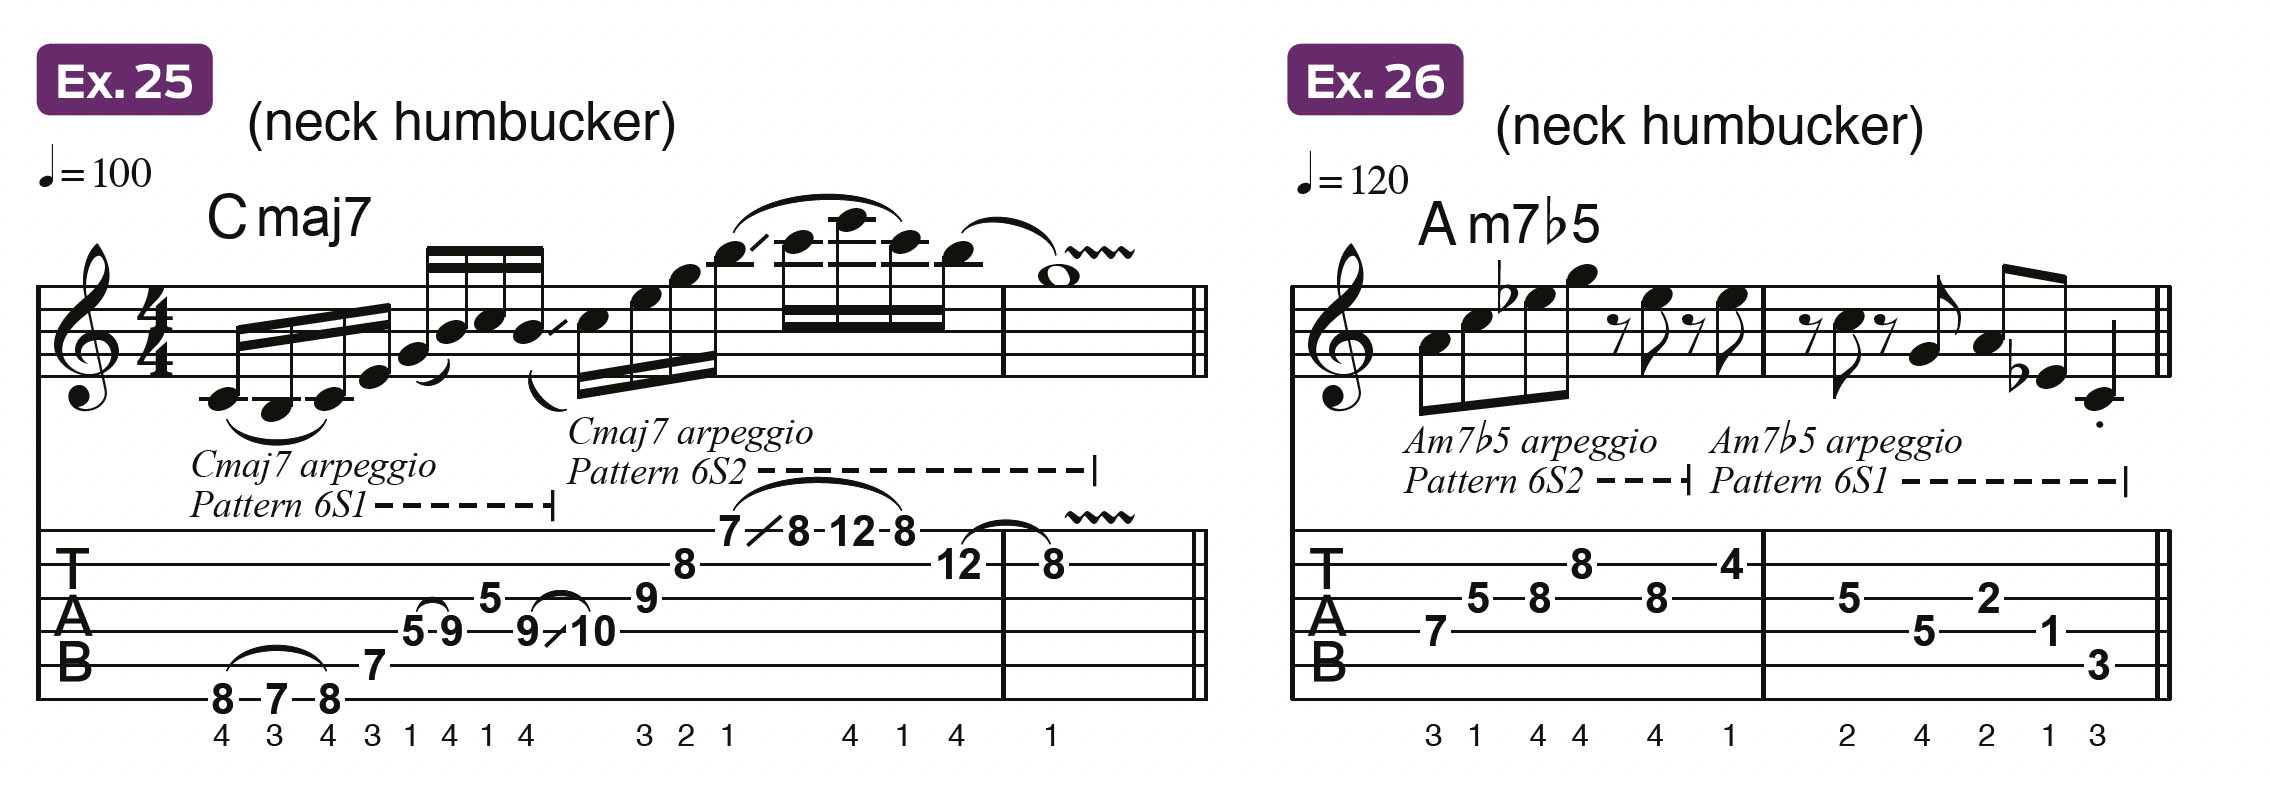
Example 25 is a legato-fueled passage that links neighboring Cmaj7 arpeggio (C, E, G, B) patterns 6S1 (see Ex. 23) and 6S2 (see Example 24). The crafty handoff occurs at the 9th fret on the D string, where the “optional” 7th degree placement of 6S1 is used to slip up to the middle-octave root of pattern 6S2.
Example 26 is a Latin-rock lick that nails an Am7b5 (A, C, Eb, G) chord change. The phrase starts in Pattern 6S2 and moves down into Pattern 6S1. Be wary of the healthy dose of upbeat attacks.
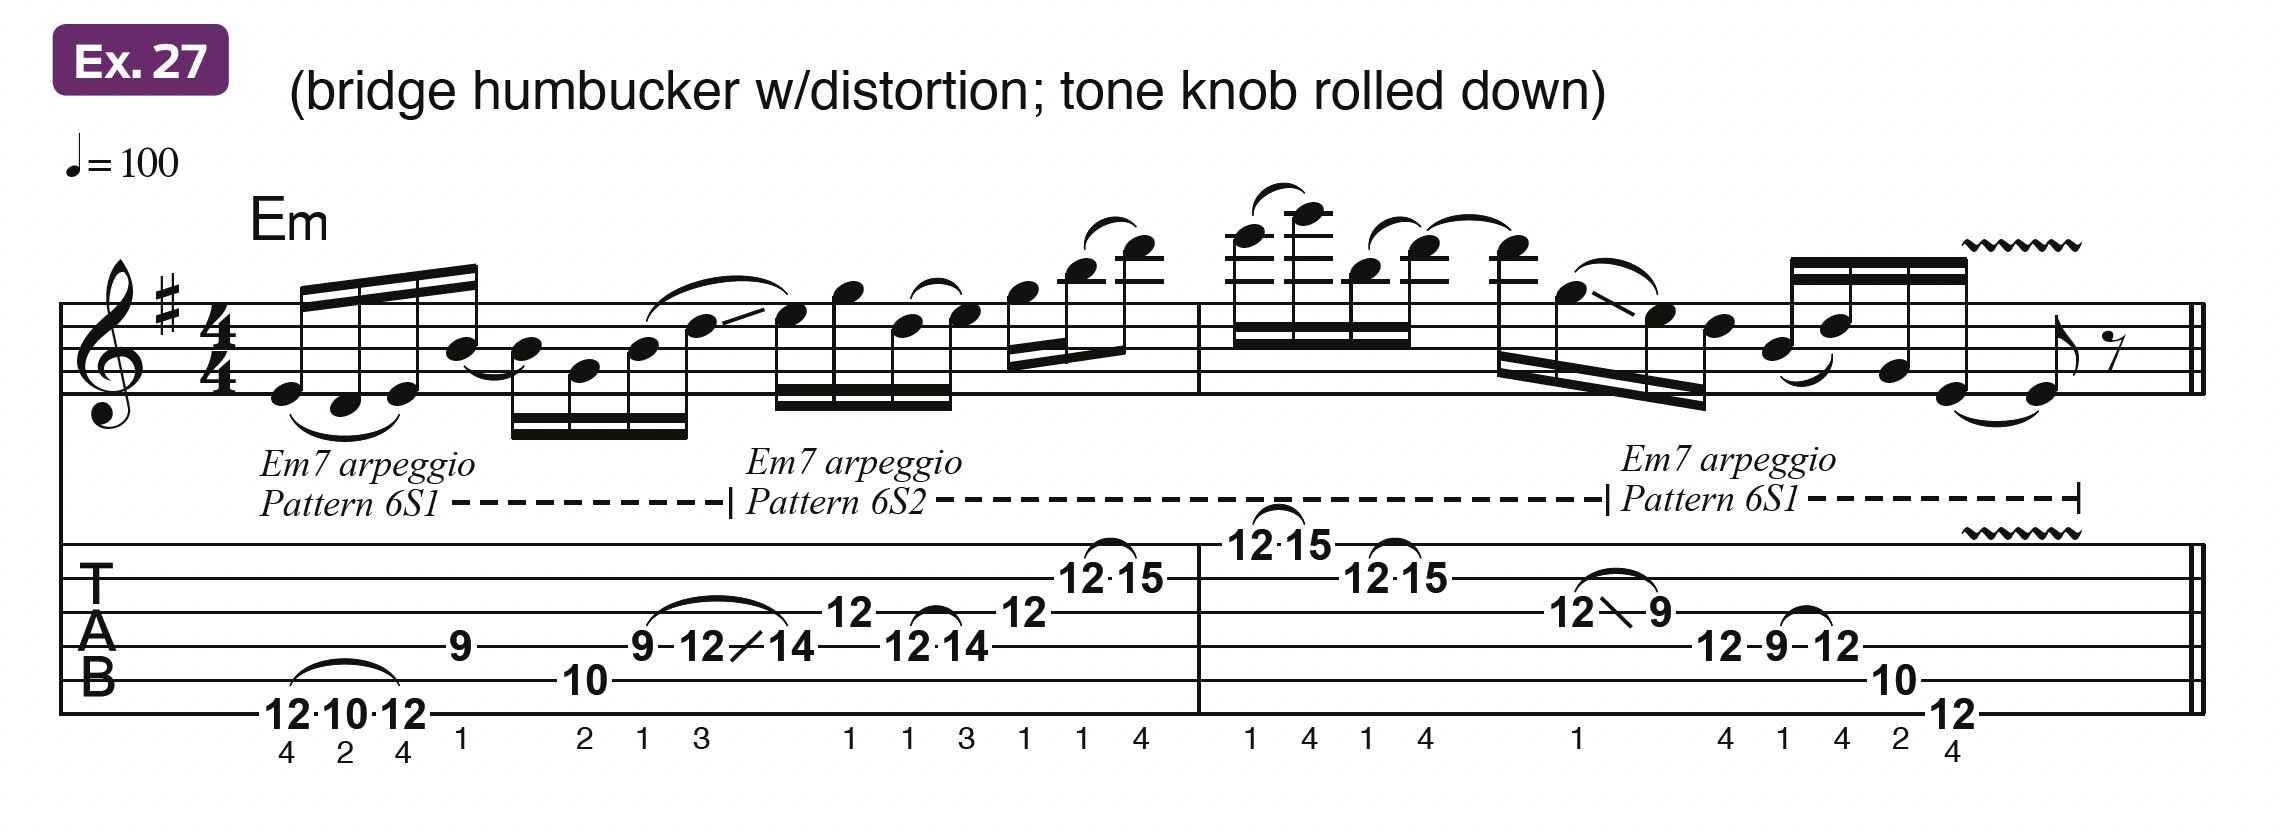
Example 27 is a flashy, hard-rock passage that outlines an E minor tonality. A liberal use of legato moves peppers the long phrase, which shifts back and forth from Em7 arpeggios (E, G, B, D) in shapes 6S1 and 6S2.
Example 28 is a funk-rock example that features a syncopated ride over neighboring E7 arpeggios (E, G#, B, D). Our last set of patterns differs from the lot in that their lowest roots are located on the 5th string.
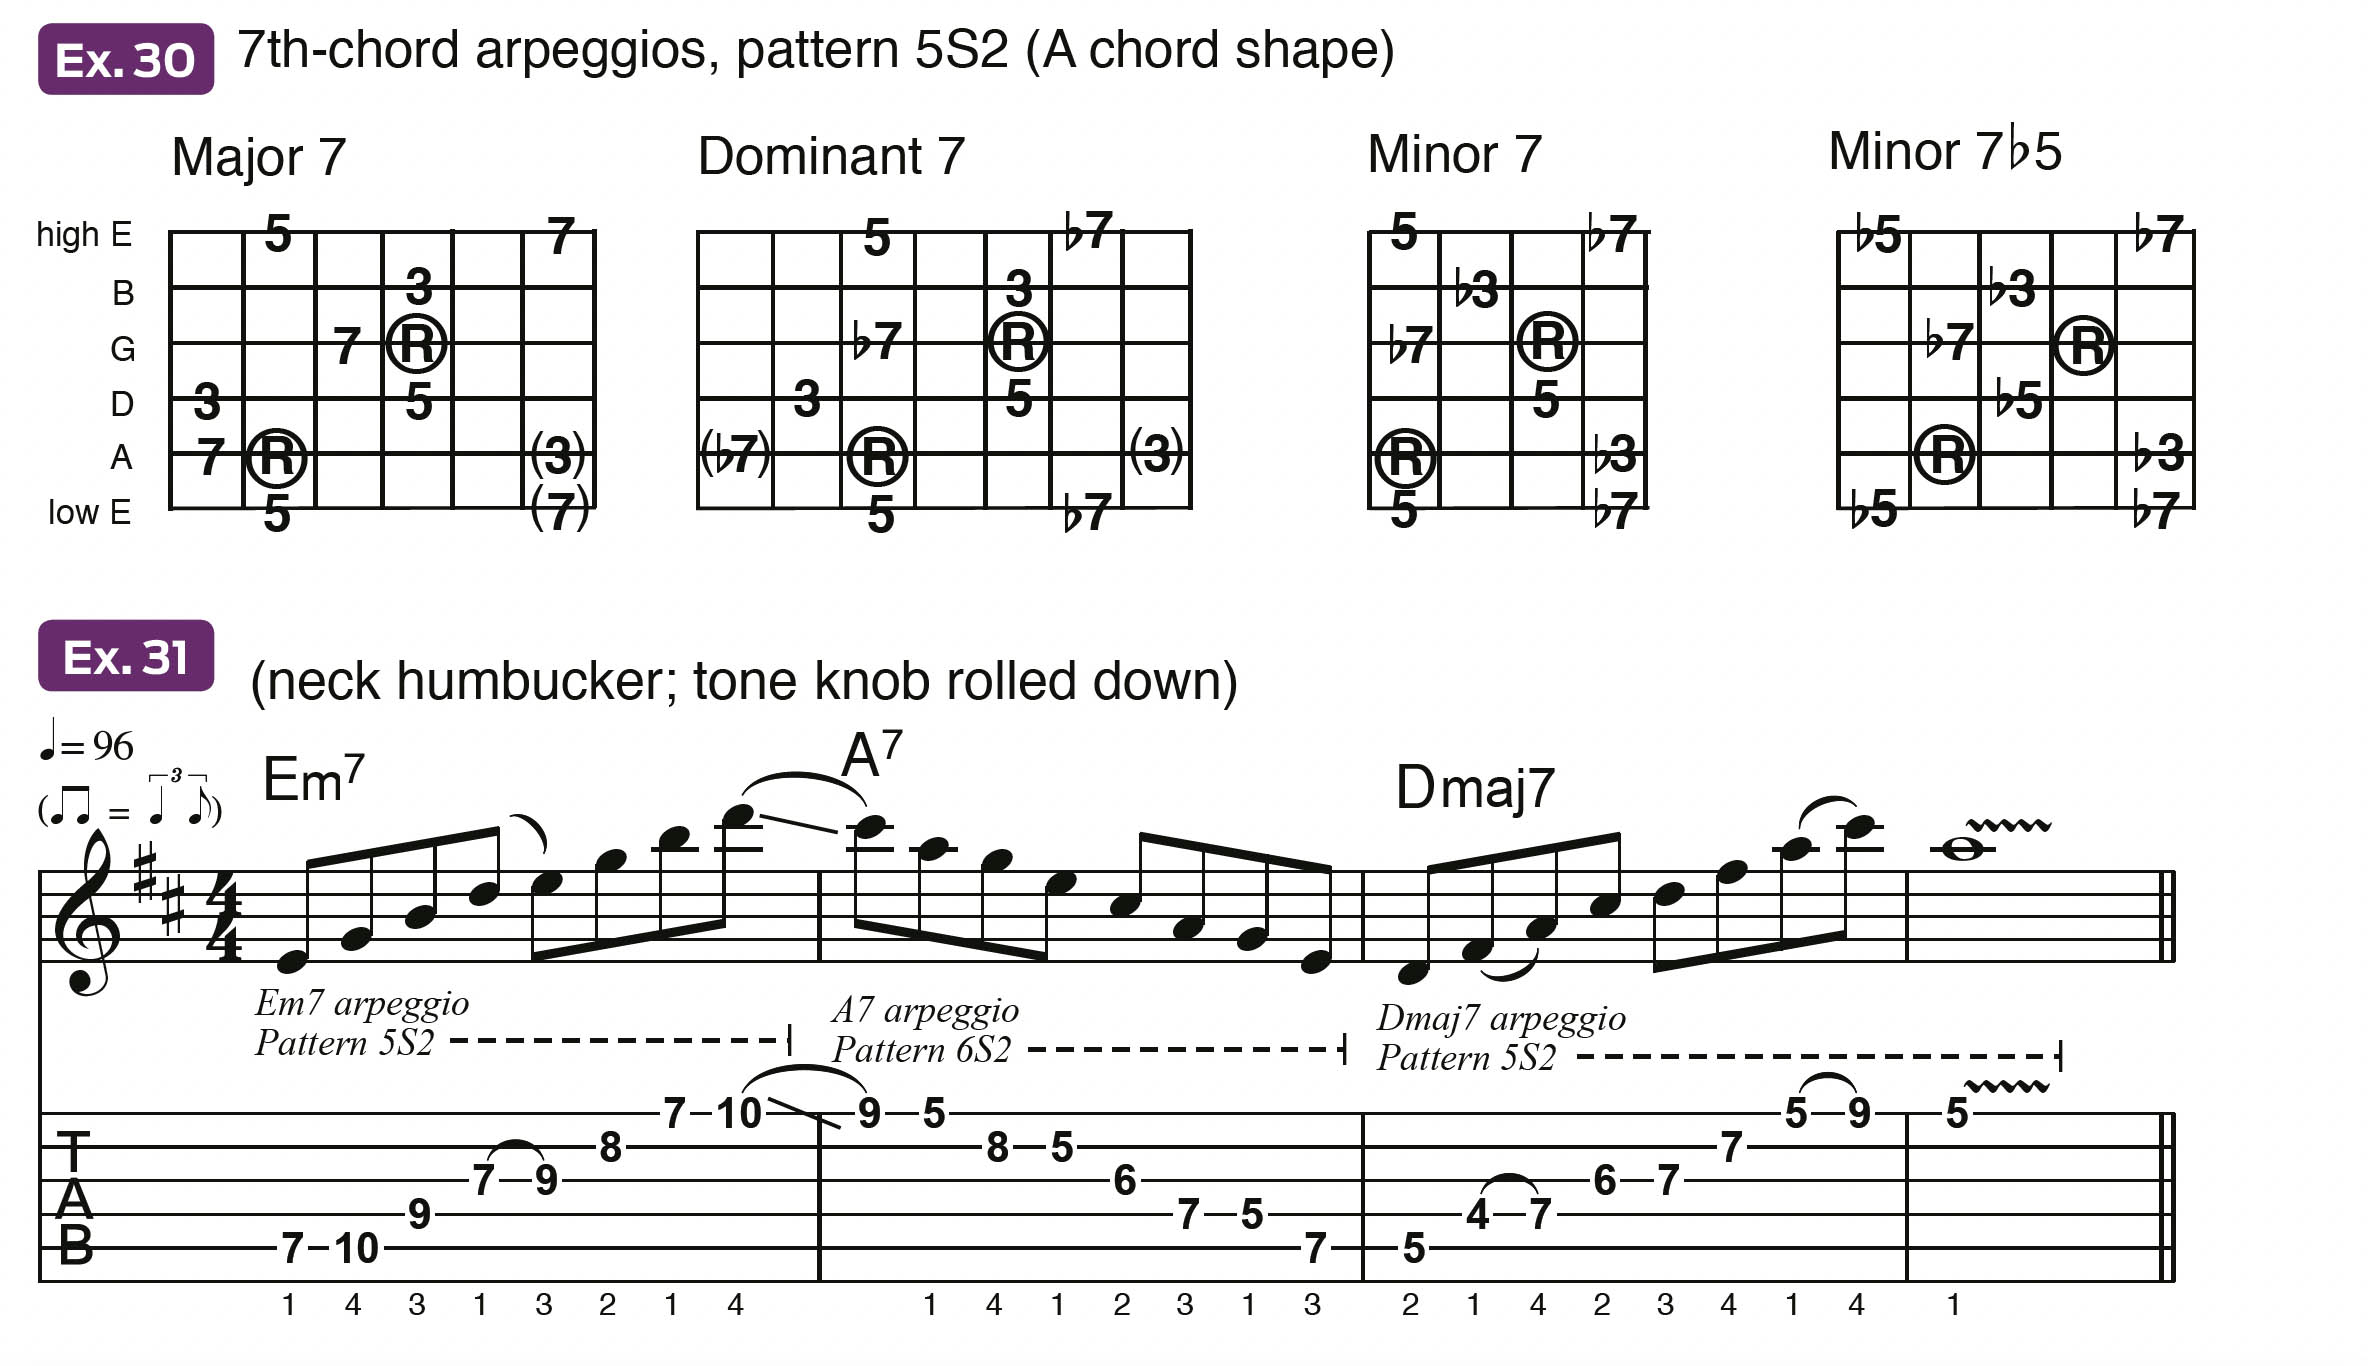
The ones in Example 29 (“Pattern 5S1,” as in 5th-string root, form 1) correspond to the root placements in an open C chord shape. The patterns in Example 30 (“Pattern 5S2,” as in 5th-string root, form 2) align with the roots of an open A chord.
Often, these shapes are the ideal counterparts with the 6th-string-root arpeggios. One ideal situation is in the ii - V - I cadences found in jazz and jazz-influenced styles. Witness how the lines effortlessly roll with the changes in Example 31.
A ii - V - I in the key of D (Em7 - A7 - Dmaj7), the Em7 arpeggio (E, G, B, D) rides up Pattern 5S2, falls back down a Pattern 6S2 A7 arpeggio (A, C#, E, G), and swings back up a Pattern 5S2 Dmaj7 (D, F#, A, C#) shape. Granted, this example sounds a bit more like an exercise than a musical passage, but add some rhythmic phrasing variation and you’ll have fuel for jazz swing licks.
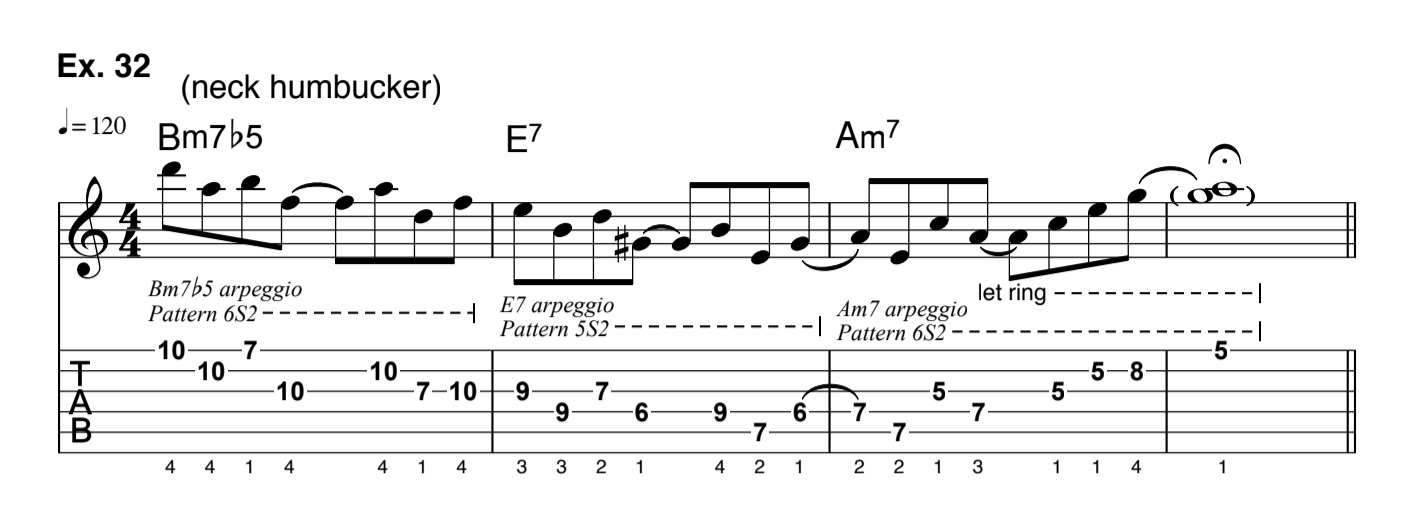
The minor-key ii - V - i, in the key of A minor, in Example 32 is in a bossa-nova style. Based on a note-skipping sequence, the passage begins with a Pattern 6S2 Bm7b5 (B, D, F, A) arpeggio, segues midstream to a pattern 5S2 E7 arpeggio (E, G#, B, D), and resolves with an Am7 (A, C, E, G) arpeggio carved from Pattern 6S2.
As promised, we’re going to close this lesson with a full-blown solo. But before we do that, here are some parting words regarding the use of arpeggios, particularly if you’re feeling frustrated.
One way to incorporate arpeggios is to play them from the tonic of whatever scale you’re using at the moment. For example, if you’re playing a rock solo using the F# natural minor scale (F#, G#, A, B, C#, D, E), throw in a couple of F#m7 arpeggios. If you’re zoning out over an A Dorian jam (A, B, C, D, E, F#, G), toss in an Am7 arpeggio or two.
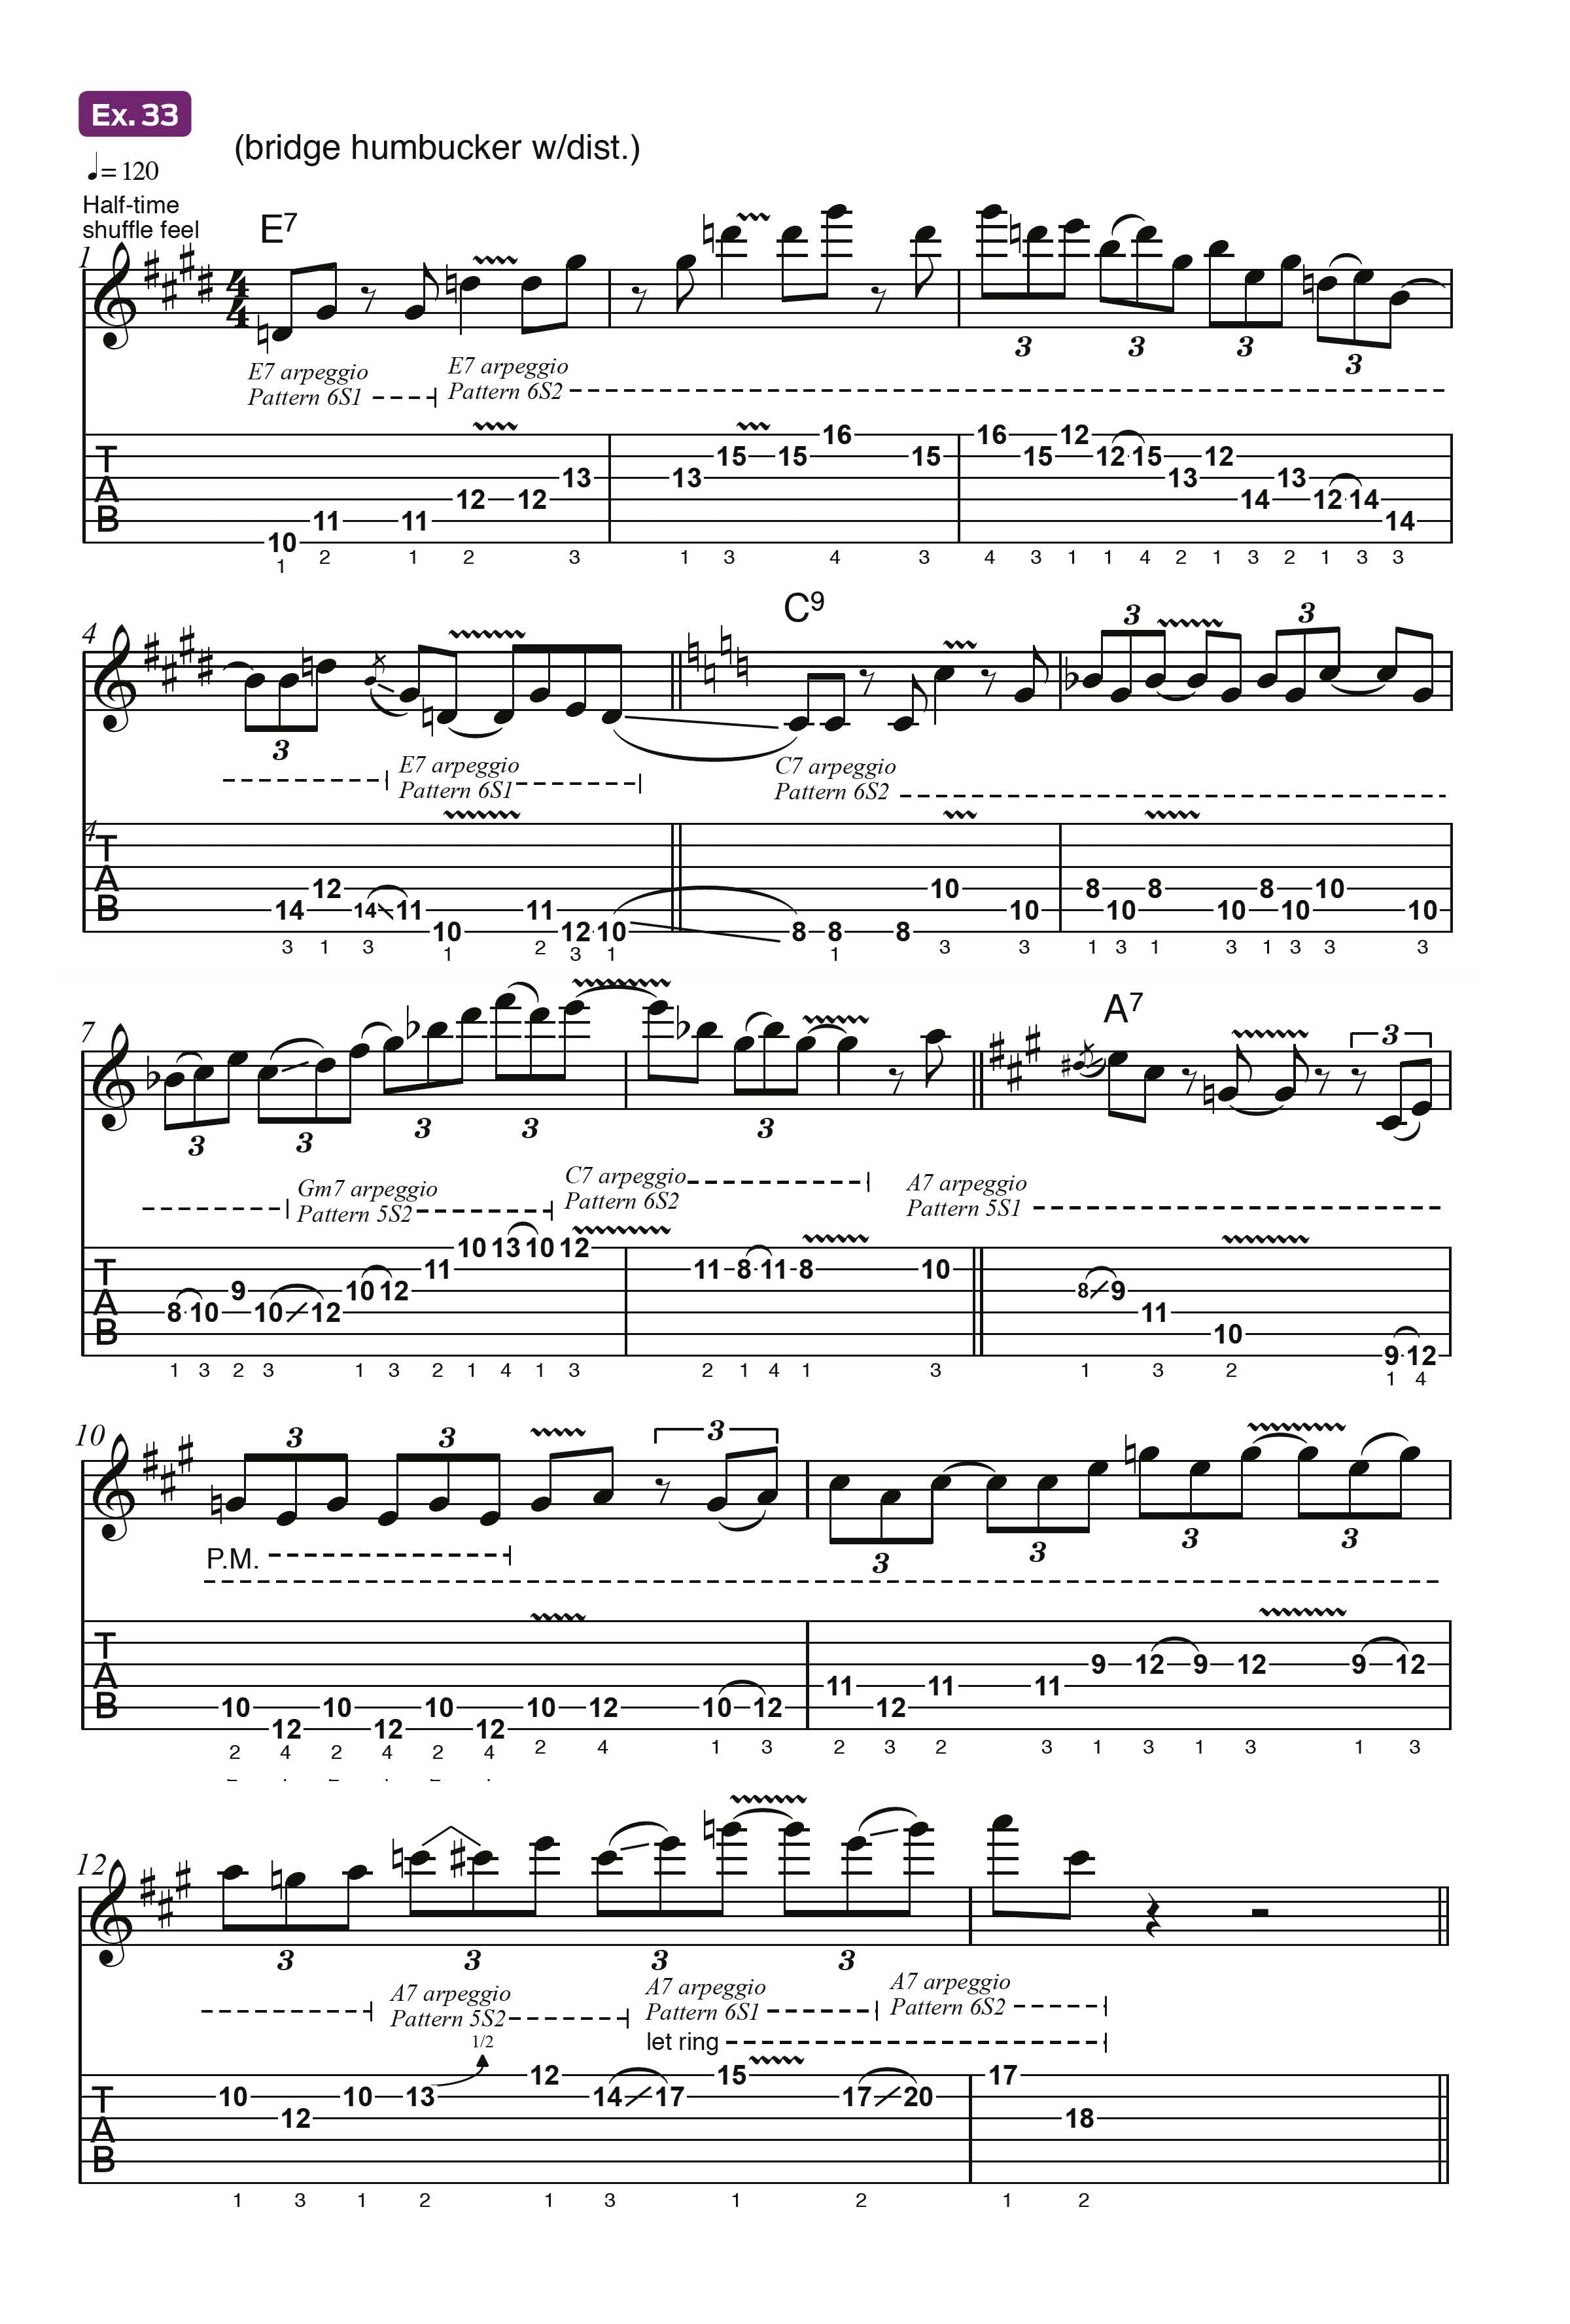
If you like to play G Mixolydian (G, A, B, C, D, E, F) over the G7 chord in a G blues, strip it down to a G7 arpeggio instead. Once you get your feet wet, arpeggios have a way of springing naturally into your playing style. They may be lurking in there already! With that said, let’s move on to the solo (Example 33). The setting is a funky, blues-rock jam over a set of “static” (unchanging) dominant 7th chords – E7, C9, then A7.
The feel is “half-time shuffle,” which resembles a slow, hip-hop groove. In lieu of scales, the entire solo is derived from corresponding dominant 7 arpeggios derived from the patterns presented in this lesson.
There’s even a cool little Gm7 arpeggio substitution over the C9 chord in bar 7 that harkens back to substitution methods discussed last month in Part 1.
The patterns are all notated between the staves, so if you take it slow and refer back to the previous examples and diagrams, everything should fall into place for you. So dial in your best Jeff Beck/Billy Gibbons/Warren Haynes/Joe Bonamassa tone and have at it!


