Guitar Essentials: Learn Arpeggios in Just One Hour
Learning more about arpeggios will not only aid your own fretboard exploration but also help you understand what’s going on in the music of others.

If you’ve ever run out of ideas while soloing, wanted a quick way to liven up a rhythm part, or are simply looking to add a few tricks to your toolbox, then becoming more familiar with arpeggios is a great way to expand your musical vocabulary.
Derived from the Italian term arpeggiare, meaning “to play the harp,” the word arpeggio refers to taking the notes of a chord and playing them in sequence, as a harpist often does, rather than all at once.
Learning more about arpeggios will not only aid your own fretboard exploration but also help you understand what’s going on in the music of others. In this one-hour workout, we’ll go through some methods of constructing and visualizing arpeggios, as well as play them over chord progressions. Although not absolutely necessary for playing through the examples here, a good understanding of the fretboard, the chromatic scale, and key signatures will certainly help out.
CHORD CONSTRUCTION
Learning the intervals and notes of which different chords are composed is key to understanding arpeggios.
Let’s begin by looking at some of the most common chord types.
Using C as the root note, here are the symbols, notes, and interval formulas for various triad and 7th-chord types you’ll likely encounter:
C major (C, C-E-G, 1-3-5)
C minor (Cm, C-Eb-G, 1-b3-5)
C diminished (C dim or C˚: C-Eb-Gb, 1-b3-b5)
C augmented (Caug or C+: C-E-G#, 1-3-#5)
C major 7 (CM7 or Cmaj7: C-E-G-B, 1-3-5-7)
C dominant 7 (C7 or Cdom7: C-E-G-Bb, 1-3-5-b7)
C minor 7 (Cm7, Cmin7, or C-7: C-Eb-G-Bb, 1-b3-5-b7)
C minor 7 flat 5 or C half diminished (Cm7 b5 or C-7 b5: C-Eb-Gb -Bb, 1-b3-b5-b7)
C diminished 7 (Cdim7 or C˚7: C-Eb-Gb-Bbb, 1-b3-b5-bb7)
FIGURE 1 shows arpeggio shapes for each of these chords.
FIGURE 1

To get the different sounds in your head, play through them slowly a few times, and remember that you can shift the shapes up or down to start on notes other than C. If some of these chord types are new to you, don’t be discouraged if you can’t instantly recall every one after playing through them a few times. Instead of taking on too much at once, you might want to read through the lesson, try the suggested exercises, and then reference these ideas later as you come across each chord in your playing.
WHAT PATTERN?
Let’s look at some of the options you have when playing any given note sequence.
As long as you remember the notes you’re aiming for, you can move around the neck without being locked into one pattern.
For example, let’s take a look at a four-note D arpeggio (D-F#-A-D). From D to F# is a major 3rd (four half steps); F# to A, a minor 3rd (three half steps); and A to the octave D, a perfect 4th (five half steps).
Now, check out FIGURE 2, which shows several ways of playing this arpeggio. Once you’re comfortable playing any interval in its various positions—staying on one string, moving to an adjacent string, skipping one or more strings—you’ll be well on your way to building arpeggios on the fly.
FIGURE 2

One of the benefits of having this ability is that you can then use arpeggios to move around the neck and seamlessly connect other phrases, as in FIGURE 3, instead of forcing each arpeggio to start and end in a single position.
FIGURE 3

INVERSIONS
When a chord has a tone other than the root as its lowest note, it’s called an inversion.
The same can be said about arpeggios. If the 3rd is the lowest note, it’s the 1st inversion. Having the 5th as the lowest note denotes a 2nd inversion, and in the case of 7th chords, a 3rd inversion results when the 7th is the lowest tone.
FIGURE 4 takes us up and down the neck through various inversions of F#m arpeggios.
FIGURE 4
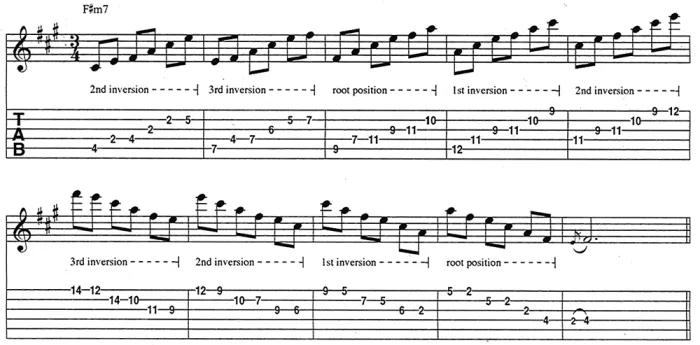
Sometimes switching to a root-position arpeggio or chord sounds disjointed, even though it contains the desired notes, and this is where inversions become useful—they can reduce the size of the interval necessary to start a new arpeggio.
In its first bar, FIGURE 5 shows a transition from a root-position Bm arpeggio to a 1st-inversion F# arpeggio. This sounds smooth because the A# (the 3rd of F#) is just a half step below the B. Note the ascending sequence (D-E-F#) found on the downbeats in the second bar. This cool and very effective melodic device is achieved through inversions of Bm and A arpeggios.
FIGURE 5

CRAWLING UP THE NECK
FIGURE 6 is a whopper of an exercise in G major that uses a repeating four-note pattern. In each new bar, one note is shifted down a string, which causes the pattern to move horizontally up the neck. When you reach the end of the G major sequence, switch to an Am arpeggio, as shown, and begin the trip back down the neck. When you reach the bottom of the pattern, switch to Bm and ascend. Then, continue in this up-and down fashion through all the triads of the G major scale (G-Am-Bm-C-D-Em-F#˚).
FIGURE 6
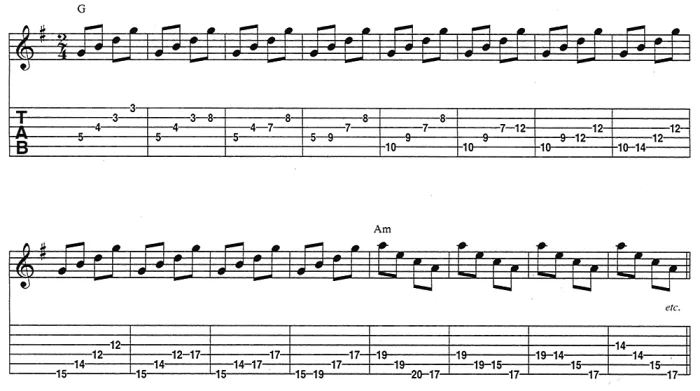
Since the patterns will naturally keep climbing until they eventually hit the end of the fretboard, you’ll have to get creative and switch direction earlier in some instances, working in an octave shift or using inversions to keep the exercise flowing.
Playing through every key would be the most thorough method, but for a more realistic goal in one session, try going through the triad cycle once, and then repeat the exercise with 7th chords harmonized from the G major scale (Gmaj7-Am7-Bm-Cmaj7-D7- Em7-F#m7b5), so that the 7th replaces the octave as the fourth note in the pattern. Take another run through any particularly troublesome arpeggios, and also make a mental note of the keys that you’ve completed, so that you can test your mind with more difficult ones the next time you practice.
LEAD TIME
FIGURE 7 is a ridiculous “look at me” legato run that combines wide left-hand stretches with right-hand tapping. The entire run is composed of a Cm7 arpeggio (C-Eb-G-Bb), and it will serve as a reminder of what is possible with the initially easy-to-grasp concept of just playing the notes of a certain chord.
FIGURE 7

And now, to wrap it all into a nice, compact musical package, FIGURE 8 introduces a simple four-bar chord progression before breaking into a laid-back eight-bar lead.
FIGURE 8

The examples throughout this lesson were meant as starting points for you to learn, transpose, and manipulate. One suggestion: Try playing an F#m7b5 arpeggio instead of F#m7 in FIGURE 4. Then try a Gm7b5 or a Bbmaj7. As soon as you’re comfortable with one exercise, it’s a good idea to change it up, so that you have to slow down and think again. But most important, keep in mind that you not just making patterns—you’re making music.
Get The Pick Newsletter
All the latest guitar news, interviews, lessons, reviews, deals and more, direct to your inbox!
Guitar Player is the world’s most comprehensive, trusted and insightful guitar publication for passionate guitarists and active musicians of all ages. Guitar Player magazine is published 13 times a year in print and digital formats. The magazine was established in 1967 and is the world's oldest guitar magazine. When "Guitar Player Staff" is credited as the author, it's usually because more than one author on the team has created the story.
“Write for five minutes a day. I mean, who can’t manage that?” Mike Stern's top five guitar tips include one simple fix to help you develop your personal guitar style
"It’s like you’re making a statement. And you never know where it’ll lead." Pete Thorn shares the tip that convinced Joe Satriani he was the right guitarist for the SatchVai Band

