Avoid Melodic Monotony and Predictability Using the Half-Whole Diminished Scale
Here’s how to create more effective lines by relating the “symmetrical diminished” scale’s recurring fretboard patterns to chords

As guitarists, we’re always seeking out comfortable, convenient scale fingerings that also help us best visualize shapes on the fretboard. To this end, fingering schemes built around repeating patterns appeal to us.
The eight-note half-whole diminished scale, which follows a consistent pattern of alternating half steps and whole steps, ideally satisfies these criteria, with symmetrical fingering patterns and fretboard shapes.
The scale is also a favorite of many musicians for spicing up lines played over dominant-seven chords.
The challenge of creating lines that don’t sound predictable and pattern-like becomes paramount
Soon after I discovered this finger-friendly entity, fluidity came delightfully quick. But to my dismay, the neatly recurring patterns in half-whole diminished – along with other symmetrical harmonic-melodic structures, namely the whole-half diminished scale, the whole-tone scale, the augmented scale and the diminished seven and augmented triad arpeggios – proved to be the quintessential double-edged sword.
While playing these crystal-like entities up and down the fretboard by rote offers a fast track to fluidity, the challenge of creating lines that don’t sound predictable and pattern-like becomes paramount.
In this lesson, I’ll show you how I’ve learned to avoid melodic monotony and predictability while getting the most out of the half-whole symmetrical diminished scale, which we will hereafter refer to simply as symmetrical diminished, and its repeating patterns.
Let’s start by first getting acquainted with the scale.
All the latest guitar news, interviews, lessons, reviews, deals and more, direct to your inbox!
Symmetrical diminished is a great device to use for generating “outside” (harmonically dissonant or adventurous) sounds in your licks and lines, which we will discuss momentarily.
Fig. 1 illustrates the scale played across all six strings and two octaves in 8th position, starting on a C root note.
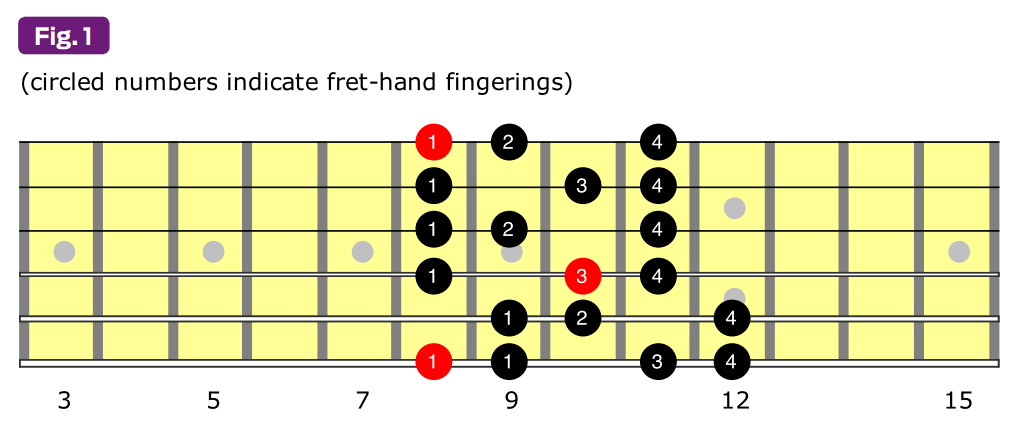
This gives us, in each octave, the note set C - Db - Eb - E - Gb (or F#) - G - A - Bb, which, in terms of intervals, or scales degrees, is spelled 1 - b2 - b3 - 3 - b5 - p5 - 6 - b7.
The b5, Gb, may also be thought of as the #4 or #11, F#.
Likewise, the b2, Db, may be considered the b9, and the b3, Eb, is also the #9, D#.
The half-step/whole-step pattern happens four times per octave, resulting in an eight-note, or octatonic, scale, which is one note larger than the more common seven-note, or heptatonic, scales, such as major, harmonic minor and melodic minor, and all their modes.
Played up one string, symmetrical diminished produces a repeating one-fret, two-fret pattern every three frets, four times within an octave.
For position playing, check out the four identical fretboard patterns for this same scale illustrated in Fig. 2, which I call Vertical Positional, numbers 1–4.
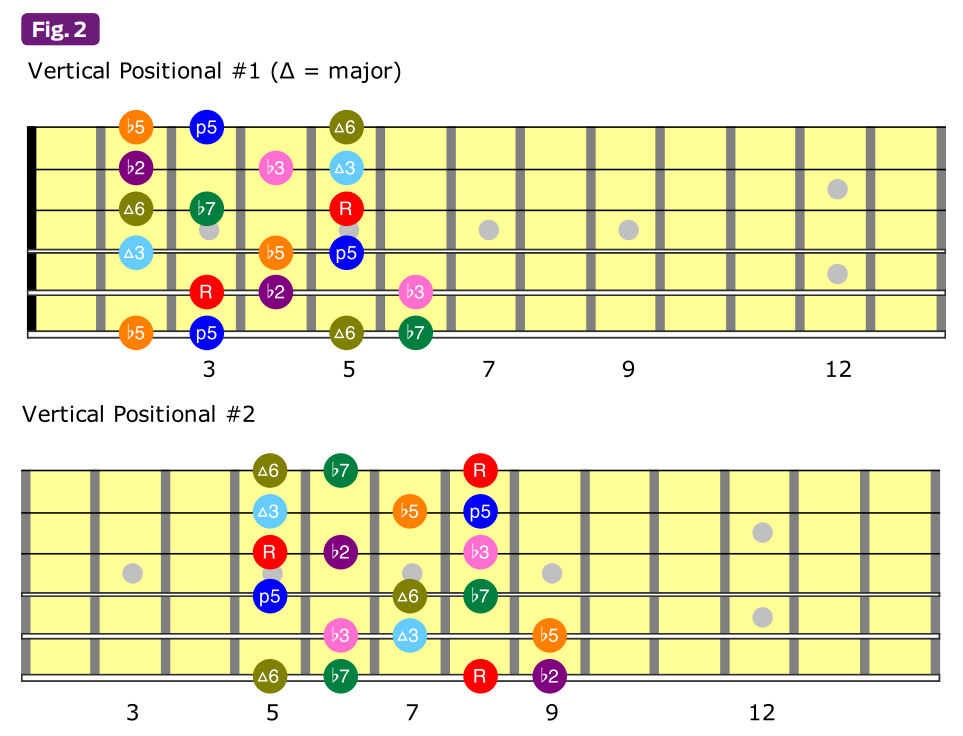
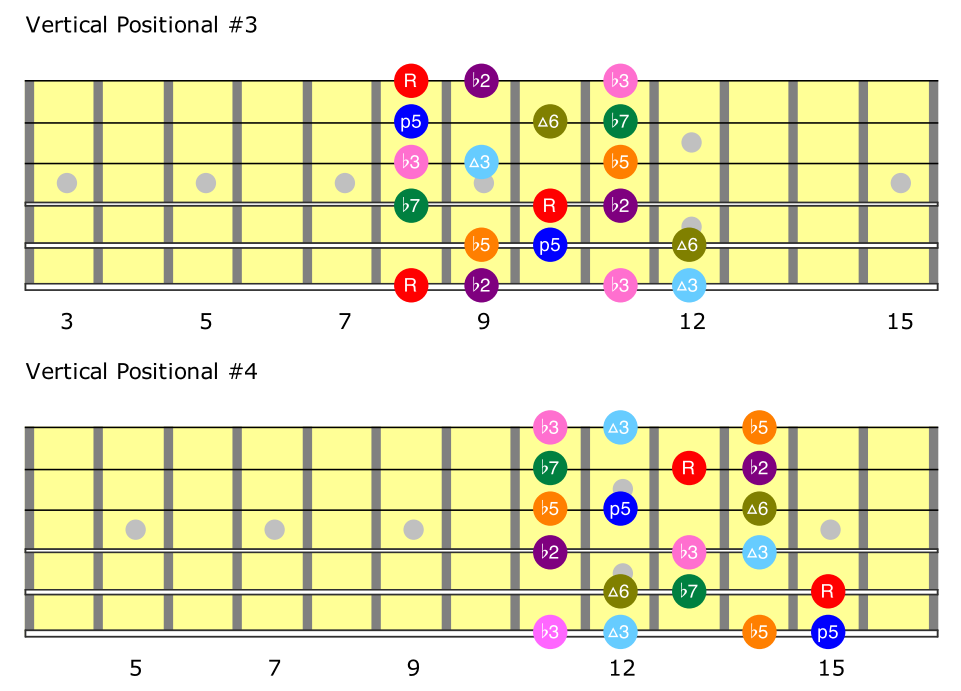
Each pattern starts on a different scale degree and is played in a different fretboard position, but notice that the shapes are identical.
Take some time to familiarize yourself with these patterns by ascending and descending them repeatedly.
As you play, try your best to acknowledge both the notes’ names and their scale-degree designations. Doing so will lay some very important and useful groundwork for what lies ahead.
The repeating, recurring patterns are what make symmetrical diminished inviting and fun to play. But at the same time, for many guitarists, those patterns mask their awareness of the ever-important scale degrees.
To play effective symmetrical diminished licks, you need a visualization approach that both connects and highlights the scale degrees
The consistent intervals and resultant repetitive finger patterns can quickly become overwhelming when trying to navigate the scale degree designations in a set of identical symmetrical diminished fingerings, and even more so when trying to utilize them over static (unchanging) harmony, not to mention through simple to complex changes.
To play effective symmetrical diminished licks, you need a visualization approach that both connects and highlights the scale degrees.
The approach I’m about to share with you makes use of the very component you’re playing over – the chords!
When playing symmetrical diminished lines, I find it helpful to visualize chord shapes and think of them as “harmonic connections,” which facilitate what I call “Chord-to-Scale Vision.”
The clearer the vision, the more effective my lines sound when playing over changes, as it helps me establish a stronger connection to what I’m playing by giving the scale a mental badge, or avatar, that I can use to envision, label and associate symmetrically identical fingerings.
The harmonic connections I see within a symmetrical diminished scale matrix, as illustrated in Fig. 2, are based on a multilayered foundation that starts with the four “drop-3” C7 chord inversions shown on the string group 6-4-3-2 in Fig. 3.
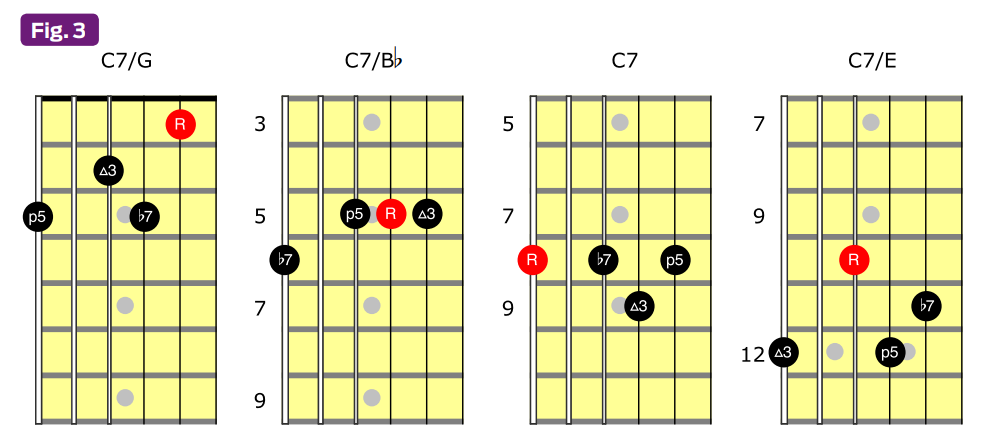
If you’re new to these chord shapes, take some time to play through Ex. 1.
Notice the emphasis on the movement from one chord’s b7 (Bb) to the next one’s root (C). This is a great way to connect the shapes up and down the neck and a key step toward seeing adjacent connections overall.

The next layer focuses on the C7/G and C7 chords, with the C7/Bb and C7/E always serving as mental bridges to the primary chords you’ll be working with.
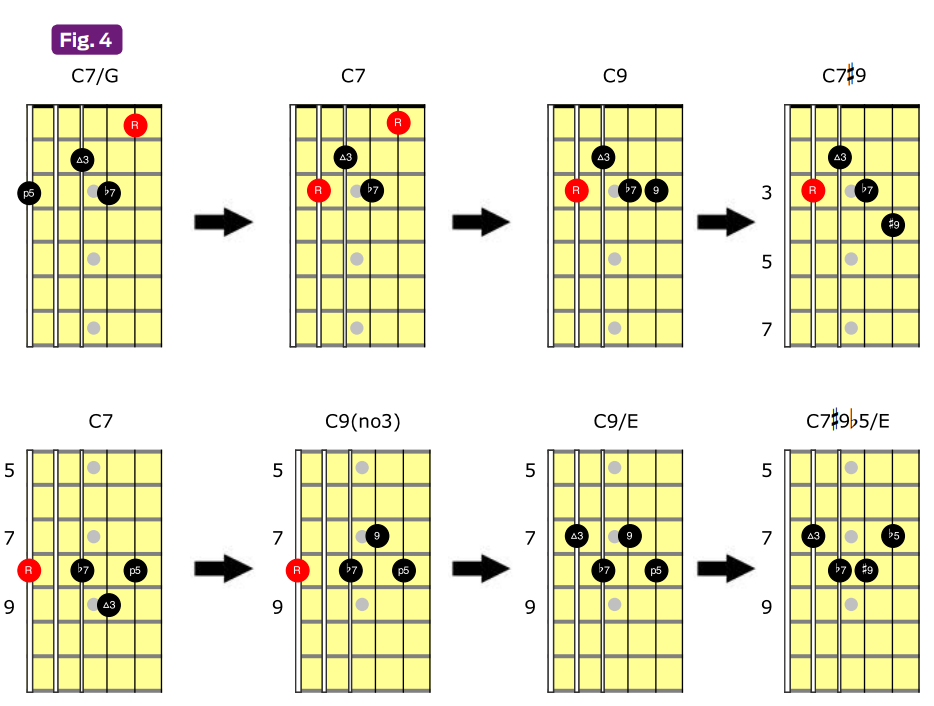
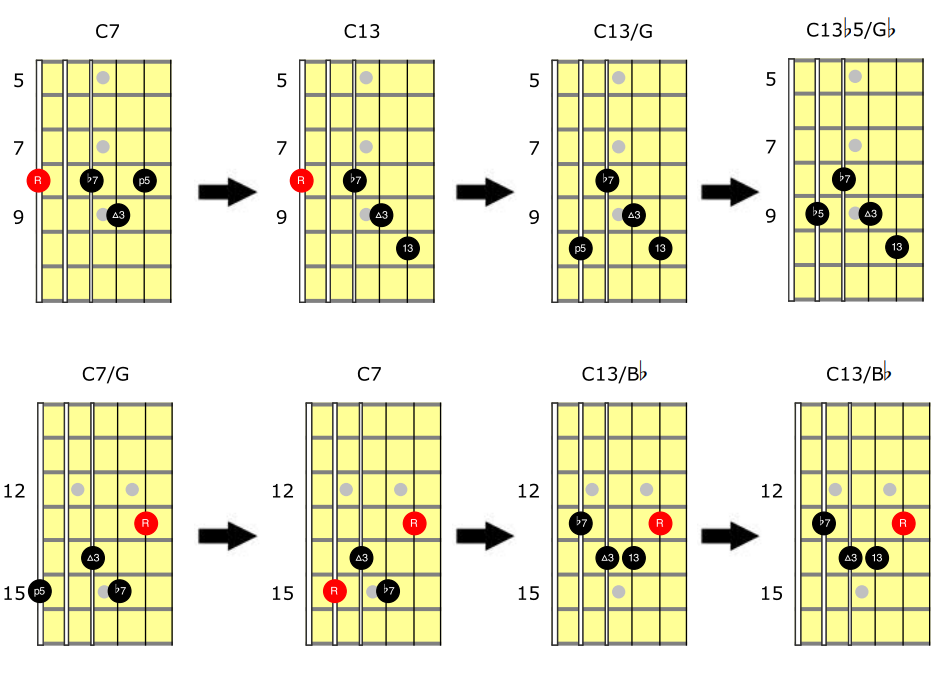
Fig. 4 shows how C7/G and C7 serve as the foundation for a system of chord extensions and alterations that culminate in an advantageous symmetrical chord vision that I call “Tritone Mirror Chords.”
A thorough understanding of the chords and chord tones you’re working with is the foundation for developing a Chord-to-Scale Vision.
Starting with the first and second columns, let’s examine the process of how those basic drop-3 voicings become hip-sounding mirrored pairs.
The C7/G voicings in column 1 shift over the 5th (G) in the bass to the next adjacent string.
The middle rows go their own separate routes, with the second-row C7 dropping its 3rd down a whole step to creating a common voicing of C9 with no 3rd.
The third row C7 raises its 5th a whole step, adding an upper extension in the form of an often-used dominant 13 voicing, C13.
A thorough understanding of the chords and chord tones you’re working with is the foundation for developing a Chord-to-Scale Vision
Moving on to the third column of Fig. 4, the C7/G voicing in the top row has its higher octave root moved up a whole step to create a go-to middle four-string C9.
The bottom row goes through a two-step process, becoming a C13/Bb as the root goes down a whole step to the b7, and the b7 goes down a half step to become a 13th.
The middle rows both lose the C root note on the 6th string, creating first- and second-inversion C9/E and C13/G voicing.
Looking at this from the perspective of the third column, all four rows are where you’ll see each chord become an extended dominant in the form of a C9 or C13.
Take note: The third column alone is gold!
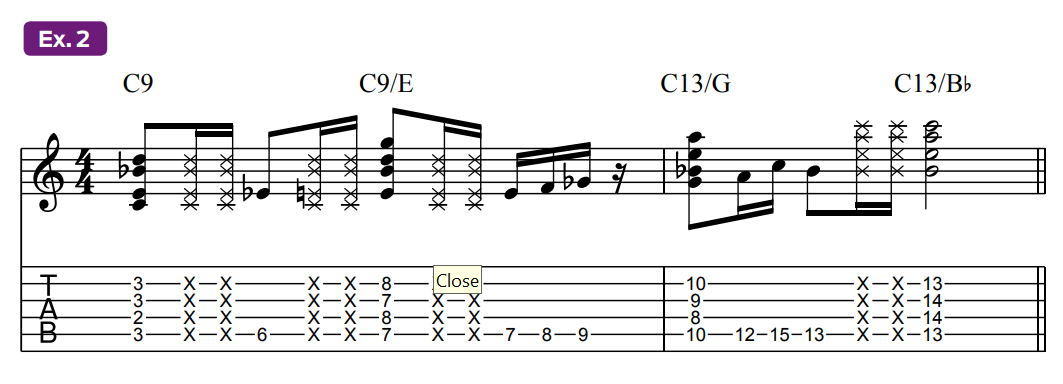
I constantly make use of these voicings when comping “inside” (non-altered) dominant sounds, as in Ex. 2.
The consistent attributes seen here are what fuel the effectiveness of the Chord-to-Scale Vision between these chords and the symmetrical diminished scale
The fourth column of Fig. 4 is where you’ll see the Tritone Mirror Chord system unfold.
The symmetry is based on the identical chord shapes in each pair (in rows 1 and 2, and in rows 3 and 4), as well as both being separated by a tritone (three whole steps).
The consistent attributes seen here are what fuel the effectiveness of the Chord-to-Scale Vision between these chords and the symmetrical diminished scale.
The harmonic connection is also consistent: The highest note of each voicing is the middle note of the whole-step/half-step three-note pattern on the second string of each scale.
Before moving on, it’s important to point out here that the C symmetrical scale works well with (i.e., sounds good when played over) all of the chord voicings illustrated in Fig. 4, except those for C9 and C9/E, as those two chord types, which were utilized here to illustrate a step-by-step process, include the natural 9th, D, which clashes with the scale’s b9 and #9 (Db and D#, respectively).
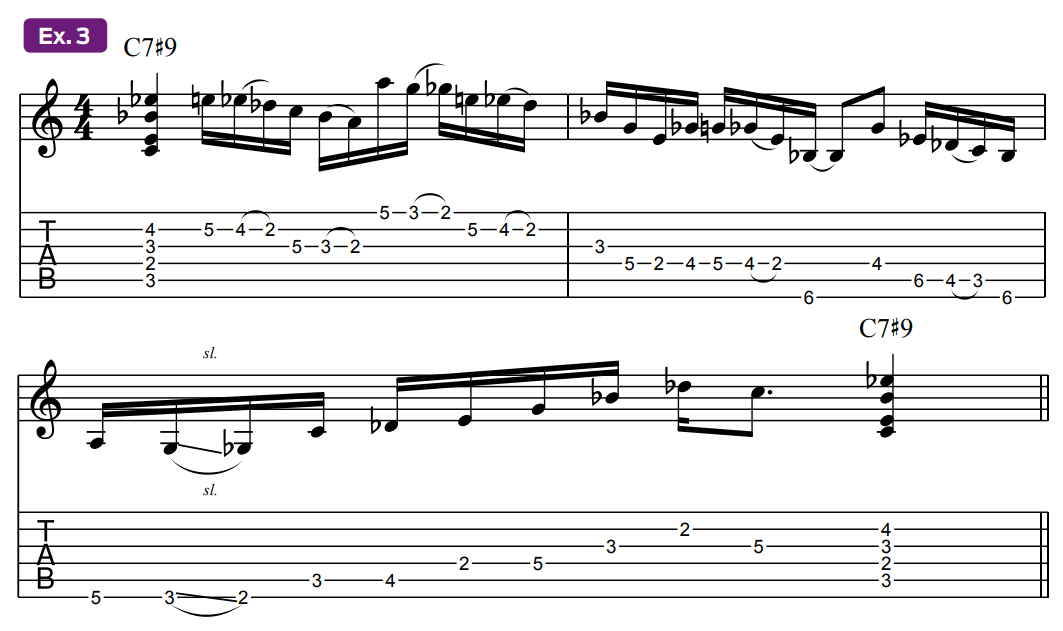
Examples 2–6 demonstrate how to make a harmonic-melodic connection between the symmetrical scale and its associated chord voicings.
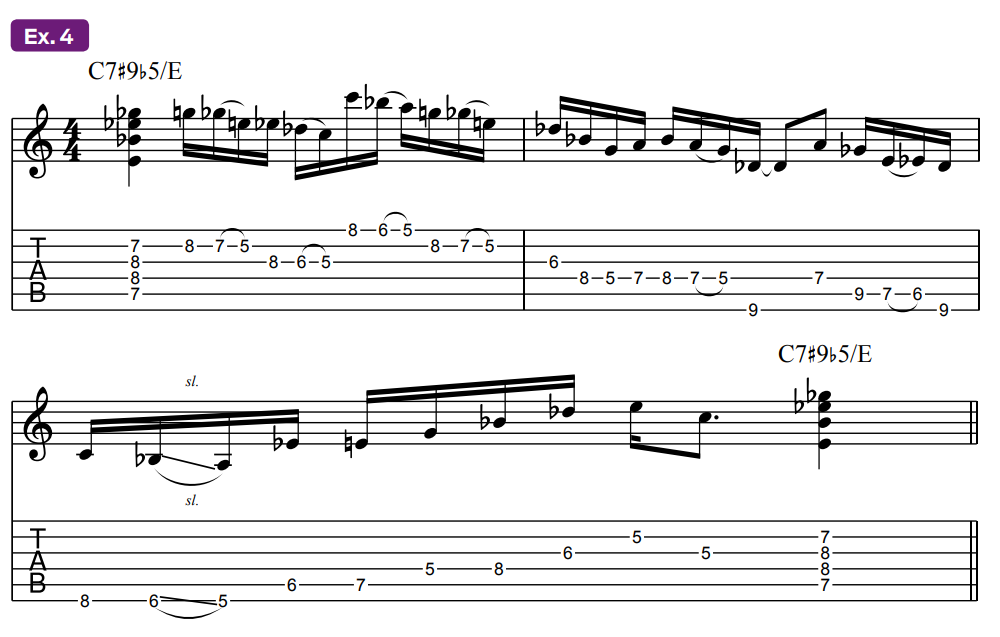
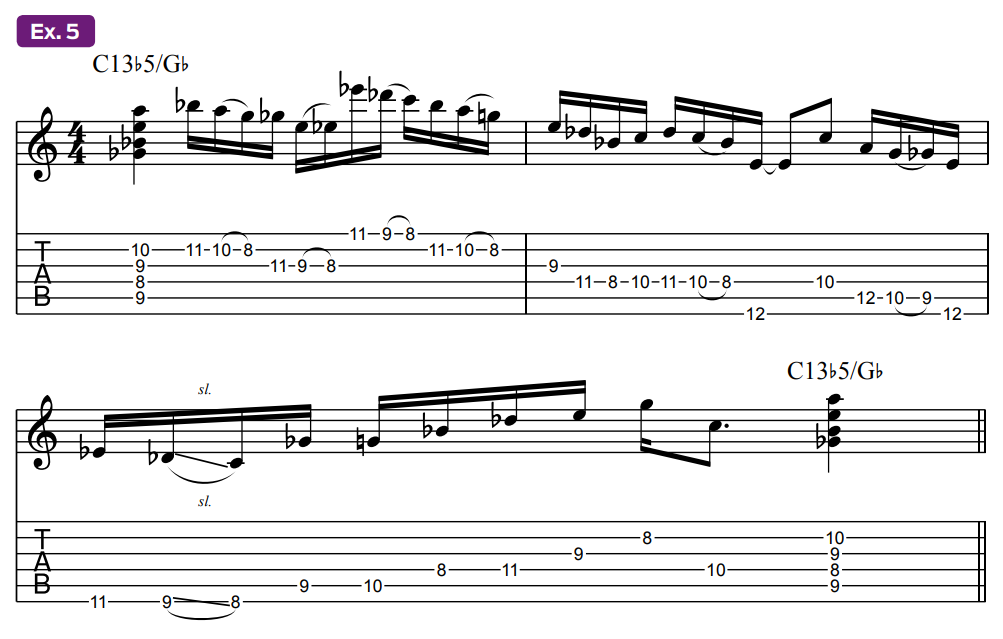
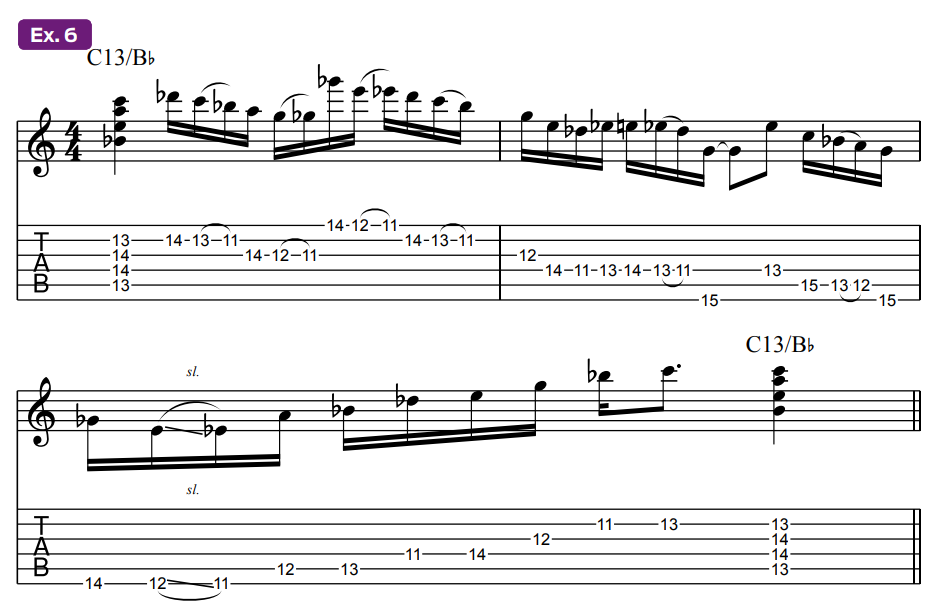
There are three things going on here.
For starters, each three-bar melodic run starts and ends with a Tritone Mirror Chord. This spelling bee-like approach is meant to start the process of linking the chord to the scale.
Second, there’s an emphasis on the aforementioned connecting note within the chord to the scale. Check out how the initial chord played on the downbeat of each of these examples has the line starting a half step up from its highest note. The idea is to utilize this consistent connection between the chord and the scale that I introduced earlier.
Lastly, the lines are identical in construction, with the exception of the last note played in the third bar on the second 16th note of beat three, right before the chord on the downbeat of four.
While each of these ending C notes breaks off from the melodic flow, they are all roots of the intended scale sound we’re going for – C symmetrical diminished.
The intention here is to more clearly define each scale’s application.
Examples 7–10 take the same approach, only this time using nested major 6ths played in an alternating direction.
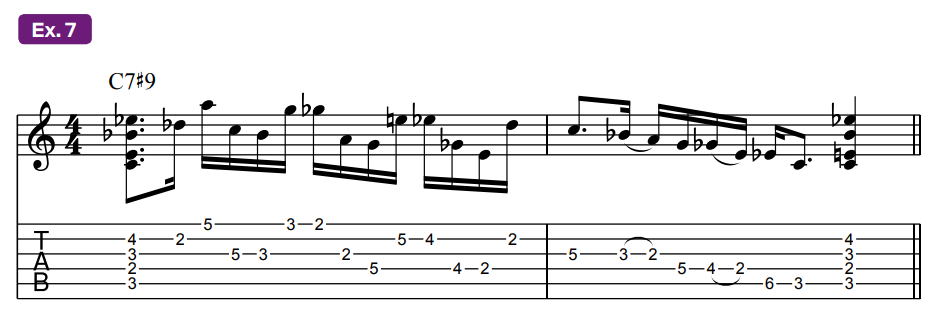


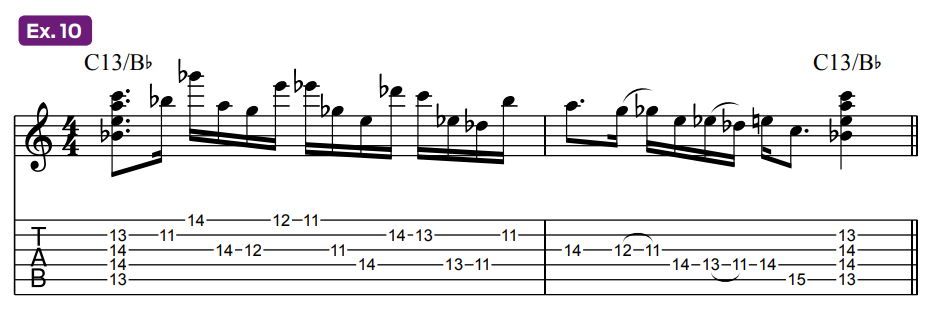
Preceding each ending chord in the second bar of each of these examples is a reversal in melodic direction that resolves to the intended C root.
The ultimate goal here is for Chord-to-Scale Vision to afford you control over your symmetrical-diminished line ideas in each of these four positions.
Our final four examples depart from the formula in the previous eight and are meant to spark ideas for how to achieve that level of control.
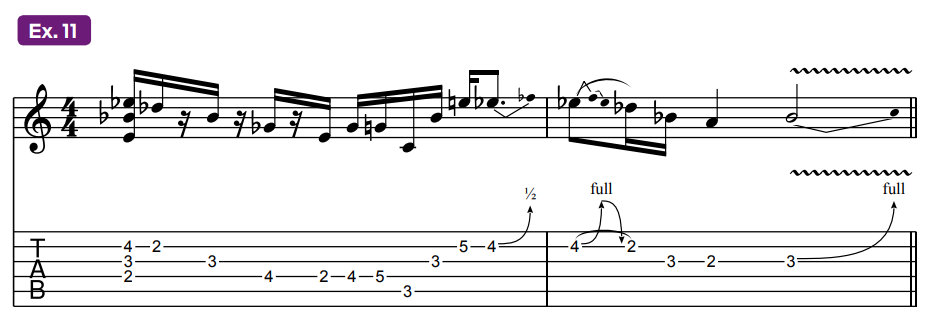
Looking at Ex. 11, you’ll see the use of the harmonic connection chord, but in a partial form.
There’s also a specific focus on C7 arpeggio tones (C - E - G - Bb), starting on the upbeat of beat three to the end of bar 1.
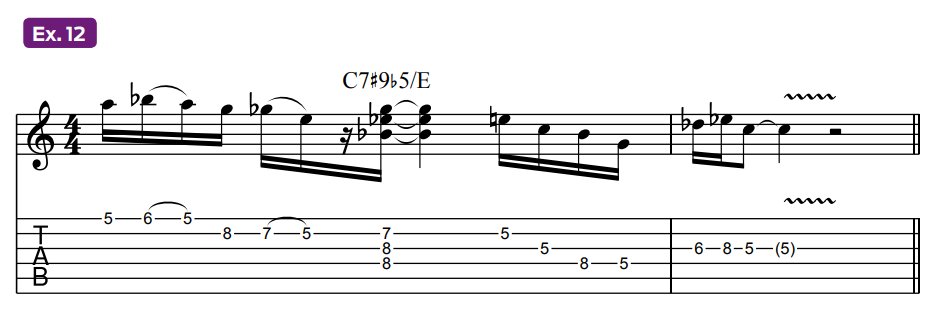
Ex. 12 throws in a partial of C7# 9b5/E, but not until the upbeat of beat two of bar 1.
You see more C7 arpeggio tones at beat four before a spicy path to resolution at the onset of bar 2.
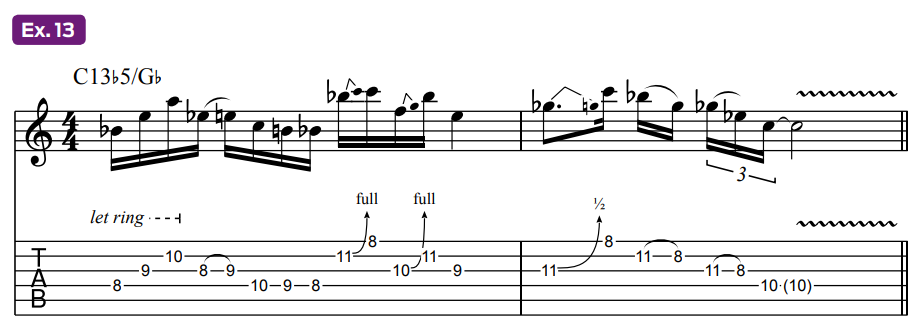
Following the 4-3-2 string set chord-partial approach, Ex. 13 arpeggiates the C13b5/Gb and proceeds to go down a more bluesy path while throwing in some choice outside tones, courtesy of symmetrical diminished.
Symmetrical fingerings can be a beautiful thing, especially when you get a cool-sounding result, like that heard in the first bar of Ex. 14.

Notice how beats one and two are fingered the same way as beats three and four, only on different adjacent strings.
The lick takes the blues road in bar 2 before resolving to a three-string partial of C13/Bb that includes a notable root on the top of the chord.
The idea of the Chord-to-Scale Vision can be applied to any symmetrical scale system.
I hope this introduction to the concept inspires you to explore this approach further and helps you create more effective lines.
Chris Buono is a top-selling TrueFire Artist with nearly 50 instructional videos, and a featured instructor on guitarinstructor.com. Bookending his years as a Berklee professor, he authored eight books, including the popular Guitarist’s Guide to Music Reading and his most recent publication, How to Play Outside Guitar Licks.

