A Lesson in 7-Tone Interval Mastery
How to apply diatonic interval patterns to a heptatonic scale to create a variety of interestingly angular melodic patterns.
It's not uncommon for a hotshot high school guitarist to venture off to music college and quickly discover that they're no longer the only player in the room with chops. Speaking from experience, it’s humbling.
Pursuant to my wake-up call, I decided not only to up my musical game but also to redefine it.
As an undergrad at William Paterson University who transplanted from the Jersey Shore, I set out on a search that led me back to my hometown area, where I met bassist Gerald Carboy.
Gerry organized “7-Tone” to be a rigorous plan of attack through all seven diatonic modes, one that included a deep dive into intervallic scale studies, among other concepts
By then, Gerry was a well-rounded, veteran professional musician who logged time playing with the likes of Tal Farlow, Dee Dee Bridgewater, Kevin Eubanks, Barry Miles, David Sancious and Jeanie Bryson. Unbeknownst to me, he’d been living right under my nose all along.
It was during fusion music’s heyday in the 1970s, when Gerry had become a high-caliber troubadour, that he developed a teaching program called The Method. It featured a cog called “7-Tone” in reference to the seven-note, or heptatonic, scales, such as the major, melodic minor and harmonic minor scales, and all their modes.
With the objective of keeping his own musical senses and chops in peak condition when not touring, Gerry organized “7-Tone” to be a rigorous plan of attack through all seven diatonic modes, one that included a deep dive into intervallic scale studies, among other concepts.
If you’re fortunate enough to study privately with Gerry, you’ll be as immersed in his methodology as I was during the early ’90s. While “7-Tone” is but one aspect of his teaching approach, it was meant to serve as the conduit for everything to follow.
It established a rock-solid playing platform and fretboard vision for me, as well as those who I, in turn, passed it on to, including Bob Lanzetti of Snarky Puppy and solo guitar modernist Harvey Valdes.
The genesis for the ideas presented within this lesson are inspired by “7-Tone.” We’re going to focus on and expand upon the second stage of the method, which is simply called Intervals. This is where you systematically slice and dice a scale into various interval sequences.
For purposes of illustration and comparison, all of the examples presented in this lesson will be based on the C major scale (C, D, E, F, G, A, B) and played in the 2nd-position fretboard pattern illustrated in Fig. 1. Take a few ascending and descending warm-up laps up and down the pattern in a stepwise, linear fashion, using alternate picking at a tempo you’re comfortable with.
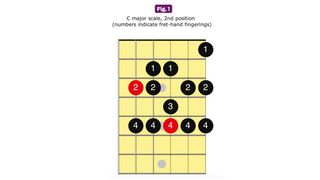
It’s important to utilize the specific fingerings prescribed here in order to get the full picture of the intervallic applications and their explanations as they will be presented.
While the first couple of examples may seem familiar, resist the temptation to gloss over them. You’re advised to play and study them in the order presented to best understand the nuances of the overall approach.
Ex. 1 has us playing the C major scale in an ascending pattern of diatonic, or scale-based, 3rd intervals, also known as “3rds” for short. (We’ll use this same shorthand terminology for identifying other intervals too.)
As a result, a few parameters are in play here. First, in order to stay within the scale - and due to its asymmetrical structure, for which all scale degrees are a whole step apart (equal to two frets), except 3 and 4 and 7 and 8, or 7 and 1, which are only a half step apart (equal to one fret) - both major 3rds and minor 3rds are used.
Major 3rds occur on the 1st, 4th and 5th degrees (C-E, F-A and G-B), and minor 3rds are played on the remaining 2nd, 3rd, 6th and 7th degrees (D-F, E-G, A-C and B-D).

Next, examine how every pair of notes (C-E, D-F, etc.) goes up in pitch, regardless of the overall direction of the scale - ascending versus descending. This will be referred to as “forward motion” and thus the naming convention “forward-forward” for this first example.
In comparison, check out Ex. 2, where every note pair “falls,” or goes backward (E-C, F-D, etc.). We’ll call this melodic contour “backward-backward.” The takeaway from these two examples is this: The direction of the intervallic pairs is independent of the scale’s general direction. Put another way, the terms forward and backward are separate from ascending and descending, which refer to the line’s overall direction.

For fingering notes that fall at the same fret on different strings, I’d like to prescribe a highly useful fretting technique called “rolling.” It’s similar to barring in that you’re using the side of a finger to fret a string, as opposed to its tip.
But rolling is a little different than barring, as you don’t actually want the notes to ring together. For example, when playing Ex. 1, you’ll hit the first interval pair that calls for rolling in bar 1, on the last two 16th notes of beat 3, where you have C on the G string’s 5th fret, followed by E, played at the same fret on the B string.
To do the roll, fret the C note with the tip of the pinkie and proceed to lay the finger’s fleshy pad, or “paw,” down onto the B string to fret the E note (as opposed to “jumping” the tip of the finger from string to string) in a way that simultaneously releases its pressure off the G string.
This movement is where we get the term rolling, as with a wheel or rolling pin. The intent is to get the full duration of each note while not prematurely cutting off the C before playing the E. Keep this in mind as you maintain forward motion on the descent, where you’ll encounter several instances that require rolling.
Our next two examples demonstrate the concept of creating a smooth turnaround as you transition from ascending to descending after reaching the line’s summit at the beginning of bar 2.

In Ex. 3, the diatonic 3rds ascend the scale to the highest note pair, F-A, on the high E string at the beginning of bar 2.
But now, instead of continuing with the forward motion, we switch to backward motion - starting with the G-E pair on the last two 16th notes of beat - and continue that motion for the remainder of the descent. This is known as a forward-backward turnaround.

In Ex. 4 you’ll do the opposite, with a backward-forward turnaround. After you get these ideas under your fingers, I suggest playing these exercises repetitively. This will strengthen your chops in both hands and increase your stamina while improving your fretboard vision and aural assimilation of the sound of the pattern.
When turning around, try to avoid repeating the top note and make sure you’re playing the starting pair in its original direction only and not tagging them onto the end in the turned direction.


Moving on to a new interval and rhythm, our next three examples employ diatonic 4ths. With the exception of an augmented 4th interval on the 4th degree (F-B), the sequence is otherwise made up of perfect 4ths: C-F, D-G, E-A, G-C, A-D and B-E.
As a result, you’ll be playing a majority of the interval pairs at the same fret on adjacent strings, for which you’ll be doing a lot of rolling with various fingers.
At the same time, we now have an eighth-note triplet rhythm, which sounds and feels “tricky,” in terms of counting and keeping track of the beats, as our pairs of notes - which are an even number, two - are now forced to reconcile with an odd-numbered subdivision and rhythmic grouping, resulting in “twos on threes,” if you will.

Examples 5 and 6 follow the basic forward-forward and backward-backward contours presented earlier, and Examples 7 and 8 introduce a new alternating-directions configuration.
Both examples have you switching the motion with every note pair as you ascend and descend the scale, which creates a more varied and interesting melodic contour and also helps “disguise” the interval pattern by making it less obvious.

The next several examples return to a 16th-note subdivision and demonstrate various ways in which to organize the combinations of forward and backward motions into a suite of six exercises based on diatonic 5ths.
As was the case with the diatonic 4ths, every interval pair is perfect (C-G, D-A, E-B, F-C, G-D and A-E), except one, a single diminished 5th on the 7th degree (B-F). Note that a diminished 5th and an augmented 4th are, for all intents and purposes, the very same interval, namely a tritone, which is short for “three (whole) tones.”
So far, there has been no deviation from the original step-wise fingering when playing this C major scale pattern in 3rds and 4ths. That changes with Ex. 9, as you’ll now play forward-motion 5ths on the descent.

An issue arises going from the interval pair B-F on beat 2 of bar 2 to the following pair, A-E, specifically the jump from F on the high E string’s 1st fret to A on the 2nd fret of the G string.
For the sake of fingering efficiency, you’ll want to avoid “jumping” your 1st finger and instead use your 2nd finger to fret the A note here, as indicated.
In fact, you should make it a point to always avoid using the same finger to play any two consecutive notes on different frets when transitioning to another string. The solution is to employ an alternate fingering.

You’ll find this fingering adjustment is needed in bar 1 of Ex. 10, for the same two notes (F and A) when transitioning from beat 3 to beat 4, within the ascending part of a backward-backward motion pattern.

A similar situation occurs in Ex. 12’s backward-forward motion, as indicated by the “2” fingering prompts below the tab, whereas the forward-backward motion in Ex. 11, as well as the alternating motions in Examples 13 and 14, avoid this issue, due to the arrangement of notes.

As you increase the size of the intervals, a couple of interesting things happen. First, there’s a reduction of notes in the sequence, consequently shortening the time it takes to play it.
However, within that shorter journey is an increasing number of string crosses and skips.


Check out Ex. 15, where our C major scale has been arranged in diatonic 6ths - both major (C-A, D-B, F-D and G-E) and minor (E-C, A-F and B-G) - going forward-forward and played in a swing-eighths rhythm.
The rhythm, in turn, is based on an eighth-note triplet feel, with the two notes in each pair being played as if they were the first and third notes of an eighth-note triplet.

Every pair involves a single-string skip, with the exception of the minor 6th pair A-F played on beat 6 of bar 1, for which our high F note has been moved over to the B string’s 6th fret, resulting in an adjacent-string cross. For the note pairs on the D and B strings (F-D and G-E), this requires a string-skipped roll.
Specific to the 5th-fret major-6th pair G-E, notice the alternate fingering used here due to the moved high F note, which is now played on the B string’s 6th fret. This combined solution allows for this interval to be applied to this fingering smoothly in both directions.
Similar scenarios are also seen in Examples 16 and 17, where you have diatonic 6ths played in backward-backward and forward-alternate motions.


We continue our interval expansion to diatonic 7ths in Ex. 18, and here you’ll see another instance of the same high F note being relocated to the B string’s 6th fret, but an alternate fingering is only needed for the E note at the 5th fret on the ascending part of a forward-forward motion pattern.
When organizing your own sets of intervallic scale applications, keep this general rule in mind: If an alternate fingering or displaced note is required, it will present itself in forward-forward motion. And whatever direction it appears in, it will always show up in the opposite direction in a backward-backward pattern.

Finally, a common occurrence in turnarounds is one or both anomalies are absent in both directions in one combination and present in the other. The latter is exemplified in the forward-backward diatonic-7ths pattern illustrated in this lesson’s final offering, Ex. 19.
This expanded-upon primer was but a brief introduction to the many intervallic scale studies included in the overall “7-Tone” program Gerald Carboy originally designed.

Using this lesson as a template, assemble your own plan of attack and apply it to any other scale pattern, position and set of fingerings you already know.
A good place to start is with the other seven modes, or positions, of the C major scale, then transpose everything to the other 11 keys, which should keep you busy for a while!
The patterns you’ll discover can then be applied to both composing and improvising melodies
Like me, you can do the same with the melodic minor and harmonic minor scales. The patterns you’ll discover can then be applied to both composing and improvising melodies.
As a whole, Gerry’s “7-Tone” program goes much deeper than this one aspect, with linear sequences, arpeggios, triad studies and an invaluable written lesson component that dives into a group of fascinating music theory concepts, such as bi-tonal harmony.
I highly recommend you seek out someone who has completed “7-Tone” and can mentor you through the full program.
Get The Pick Newsletter
All the latest guitar news, interviews, lessons, reviews, deals and more, direct to your inbox!
Chris Buono is a top-selling TrueFire Artist with nearly 50 instructional videos, and a featured instructor on guitarinstructor.com. Bookending his years as a Berklee professor, he authored eight books, including the popular Guitarist’s Guide to Music Reading and his most recent publication, How to Play Outside Guitar Licks.

"It’s like you’re making a statement. And you never know where it’ll lead." Pete Thorn shares the tip that convinced Joe Satriani he was the right guitarist for the SatchVai Band

"This is something you could actually improvise with!" Add vibrant rhythms and sophisticated chords to your guitar playing with Jesse Cook’s five essential flamenco techniques


